 TealShopper
User's Manual
TealShopper
User's Manual
Program Version 1.5.1
Last Updated: January 22, 2009
Table of Contents
Chapter 1 – Quick
Start................................................................................................. 1
Description......................................................................................................................... 1
Overview............................................................................................................................ 1
All Lists View................................................................................................................. 1
List View........................................................................................................................ 1
Chapter 2 – All Lists
View............................................................................................. 2
Opening Lists..................................................................................................................... 2
Creating and Deleting
Lists.................................................................................................. 2
Organizing Lists.................................................................................................................. 2
Chapter 3 – List View..................................................................................................... 3
Editing Items...................................................................................................................... 3
Creating and Deleting
Items................................................................................................. 3
Sorting Items..................................................................................................................... 3
Category Lock.................................................................................................................... 4
Popup Item Menu................................................................................................................ 5
Reminder Flags.............................................................................................................. 5
Quantity......................................................................................................................... 5
Price.............................................................................................................................. 5
Category........................................................................................................................ 5
Note.............................................................................................................................. 5
Save as Frequent Item..................................................................................................... 5
Chapter 4 – Price,
Quantity, and Totals.................................................................... 6
Quantity............................................................................................................................. 6
Price.................................................................................................................................. 6
Totals................................................................................................................................ 7
Subtotal Calculation........................................................................................................ 7
Included Items................................................................................................................ 7
Taxes............................................................................................................................ 7
Chapter 5 – Categories................................................................................................. 8
Selecting Categories........................................................................................................... 8
Creating a New Category...................................................................................................... 8
Editing Categories............................................................................................................... 9
Adding Categories........................................................................................................... 9
Renaming Categories...................................................................................................... 9
Deleting Categories......................................................................................................... 9
Deleting All Unused Categories........................................................................................ 9
Adding Preset Categories................................................................................................ 9
Assigning Categories by
Dragging........................................................................................ 9
Default Categories.............................................................................................................. 9
Chapter 6 – Frequent
Items....................................................................................... 10
Saving Frequent Items...................................................................................................... 10
Loading Frequent Items..................................................................................................... 10
Editing Frequent Items...................................................................................................... 11
Chapter 7 – List
Preferences..................................................................................... 12
Header Color................................................................................................................. 12
Paper Color.................................................................................................................. 12
Category Divider Color................................................................................................... 12
Total Items................................................................................................................... 12
Tax Rate...................................................................................................................... 12
Icon............................................................................................................................. 12
Default Preferences............................................................................................................ 2
Chapter 8 – Importing
and Exporting........................................................................ 1
Emailing Items................................................................................................................... 1
WebShare.......................................................................................................................... 1
Logging In...................................................................................................................... 1
Main Menu..................................................................................................................... 2
Exporting Lists............................................................................................................... 2
Importing Lists................................................................................................................ 2
Browser /PC Access....................................................................................................... 3
List Import/Export Format................................................................................................ 3
Chapter 9 – Advanced
Operations............................................................................. 5
Purging Items..................................................................................................................... 5
Modify Items....................................................................................................................... 5
Check All....................................................................................................................... 5
Un-Check All.................................................................................................................. 5
Sort All.......................................................................................................................... 5
Cloning Lists...................................................................................................................... 5
Sample Lists...................................................................................................................... 6
Appendix A – Revision
History................................................................................... 7
Appendix B – Contact
Info........................................................................................... 8
Appendix C – Purchase................................................................................................ 8
Appendix D – webOS
Products.................................................................................. 9
TEALSHOPPER................................................................................................................. 9
TEALTIME......................................................................................................................... 9
TEALSPEED DIALER AND
LAUNCHER............................................................................. 10
TEALFISHTANK AQUARIUM
SIMULATOR......................................................................... 10
TEALBABY SLEEP TRAINER........................................................................................... 11
TEALLEVEL UTILITY,
FLIGHT, AND VEHICLE GAUGE...................................................... 11
Appendix E – Legal
Notice........................................................................................ 12
List and organize your shopping, tasks, and errands with
TealShopper, the supercharged list manager from TealPoint Software. With TealShopper, you can easily organize
your entries with drag and drop categories in an attractive, intuitive
interface.
To save time with commonly-purchased items, you can save
them into a frequently-used items list and reload them at any time. Other tools let you flag important items,
make copies of lists, and customize each list's appearance and categories. Finally, to help plan your budget, you can
even enter product quantities and prices, and have your total automatically
calculated for you before you reach the checkout line.
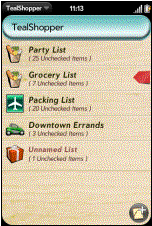
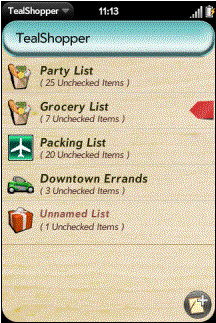
TealShopper consists of two primary interface screens:
The All Lists View
shows an overview of all your shopping, errand, and other task lists. Use it to create new lists or organize
existing ones. Tapping on a list entry
opens up that list in the List View, below.
When a list is opened up for
editing, its contents appear in as items in the List View. You can add, modify, or delete items
here. When done, Swipe Left in
the gesture area to return to the All Lists View.
Each list entry shows the list name, icon, and the number of checked and/or
unchecked items in the list.
Tap on a list name to open it up
for viewing and/or editing.
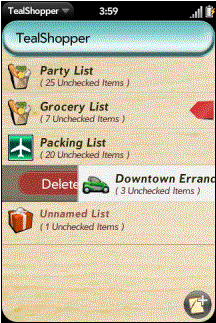

Tap the Add icon, as pictured, to create a new list.
To delete a list, swipe right on
its name, dragging it off screen.
Lists can be rearranged into any order you wish.
To move reorder existing lists,
first tap and hold on a list name to select it, then drag it up or down to a
new position. New lists initially
appear at the bottom.
When a list is opened up for
editing, its contents appear in as items in the List View.
Tap
on an item to select it and activate the text cursor. Type the new text and tap
OK when done.
Creating and
Deleting Items
To create a new item, tap the Add
Item icon in the lower right corner of the screen. If an item is activated, the new item will
be created directly below it, and will inherit the previous item’s category, if
any. If no item is selected, the new
item will be added to the bottom of the list.
To delete items, swipe right on
their names, dragging them off screen.
Items
are not restricted to any fixed order, but can be freely dragged up in down in
the list. Tap and hold on an item briefly before dragging it to a new location.
If you want to quickly reorder all
items in the list, select the Sort button on the bottom left of the
display. This button will let you sort the items in the list by category, name,
etc. (New in
1.2)
Note that the sort button
rearranges the existing entries, but does not enforce any ongoing rigid
order. When you edit or create new
entries, they will be freely movable and will not automatically move after you
modify them.
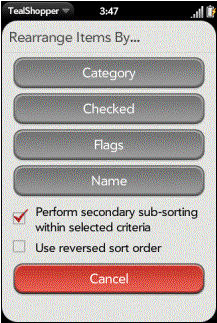
The following sort options are available:
Category
Sorts
the list alphabetically by category name
Checked
Sorts this list placing all
checked items before unchecked ones.
Flags
Sorts all items by the optional
visual flag associated with each item.
By default, flags are sorted in the following order:
·
Red
·
Yellow
·
Blue
·
Green
·
(no flag)
Name
Sorts all items
alphabetically by item name.
Perform Secondary Sub-Sorting
When this option is selected,
items within each sorted “group” are sorted further using default
criteria. For instance, if you sort
your items by category, within each category, the items will be progressively
sorted by checked, flag, and name order.
Using the above example, if this
option is not selected, then the items will be sorted by category, but
within each category they’ll retain their original order relative to each
other.
Use Reversed Sort Order
When this option
is selected, items are reordered in reverse order from bottom to top.

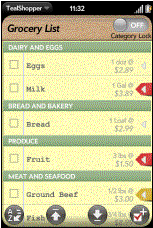
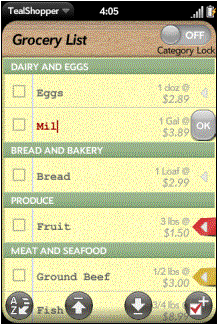
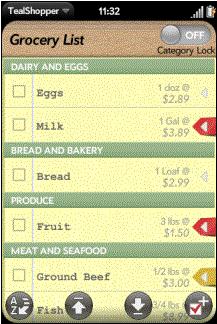
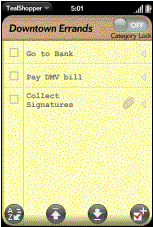
At the top of the List View,
the Category Lock slider affects how categories are treated when
you drag items around.
If the Category Lock is ON,
then items always retain their category (if any) even when you move items around. New category headers will automatically be
created, if necessary, so that each item appears under a correct category
header. Note that duplicate headers are
possible, since items with the same category can appear in different parts of a
list.
However, if the Category Lock
is OFF, then items will change category to match whatever header you drag them
under. Use this as an easy way to
re-categorize items simply by dragging.
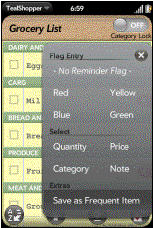
To add a category, reminder flag,
note, or other detail to a list item, tap on the triangle to the right of the
item name. The Popup Item Menu
will open, allowing you to select from the following options:
Adds a visual reminder that an item
is of particular importance. When a
list contains one or more items with flags, the list will also have a flag in
the All Lists View. The flag
shown there will correspond to the highest priority flag used within the
list. Flags are ranked in the following
descending order of importance:
·
Red
·
Yellow
·
Blue
·
Green
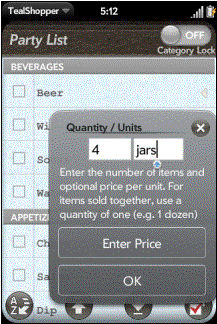
Specifies a quantity and optional
unit of measurement for an item. The
quantity is used to calculate a total price.
See the chapter: Price, Quantity, and Totals for more details on
properly using price and quantity values.
Specifies a per-unit price for an
item on a shopping list
Specifies a category for the
selected item. See the chapter: Categories
for more details.
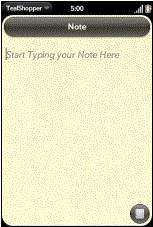
 Note
Note
Adds a note to the selected
item. When a note is present, a paper
clip icon appears next to the item name.
See the chapter: Frequent Items
for details on using this selection.
A unique capability of TealShopper
is the ability to specify a price and/or quantity for items in your list. These can serve as simple reminders, but can
also be used to automatically calculate a total of checked, unchecked, or all
items in your list.
To specify a quantity, select the Quantity
choice in a list item’s Popup Item Menu.
The popup box that opens will
contain two text fields. In the left
field, specify the quantity of items as an integer (5), decimal (1.23), or
fraction (1 3/4).
In the right field, you can
optionally specify a short word or abbreviation to remind you of the unit of
measurement you’ll be purchasing. Both
the quantity and units will appear next to the item name in the list.
IMPORTANT NOTE: If you plan to specify a price for the
item, make sure the quantity and units you specify correspond to the
price. The price entered should be a
per-unit value matching the quantity.
For instance, if you are buying 5
pounds of peaches at $1.50 per pound, then you would be correct to enter “1.50”
as the price, “5” as the quantity, and “lbs” as the units.
 However,
if you are purchasing, say, a six pack of beer for $8, then you should enter
“1” as the quantity, not “6”, since the beer is priced per pack not per can.
You can enter “pack” as the units to help you remember this.
However,
if you are purchasing, say, a six pack of beer for $8, then you should enter
“1” as the quantity, not “6”, since the beer is priced per pack not per can.
You can enter “pack” as the units to help you remember this.
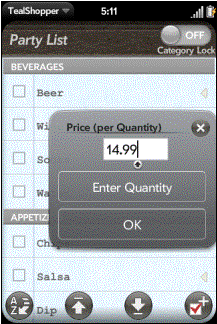
Enter your per-quantity price in Price
popup box. Enter it as an integer or
fixed point decimal number. Do not use
dollar signs or other currency symbols.
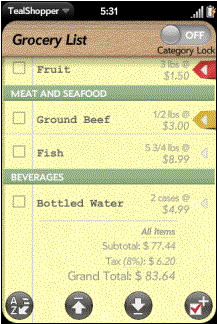 Whenever
prices are set for one or more items, a total is automatically calculated and
will appear at the bottom of the list.
Whenever
prices are set for one or more items, a total is automatically calculated and
will appear at the bottom of the list.
The subtotal is calculated by
multiplying the price and quantity values of each applicable item and adding
all of these products together. Items
with a price but no quantity are assumed to have a quantity of one.
 Totals
can include all items with prices, or optionally include only checked items or
only unchecked ones.
Totals
can include all items with prices, or optionally include only checked items or
only unchecked ones.
To set which items are shown, open
up the list’s Preferences Menu from the application menu bar at
the top of the screen. As a shortcut,
you can also tap on the total summary at the bottom of the list.
(New in
1.2)
Sales taxes are automatically
calculated and added to the subtotal.
Set the tax rate in the list Preferences screen. Like all list preference options, the tax
rate can be set on a per-list basis.
Categories provide a powerful way to organize items within a
list. When one or more items in a list
have been assigned to a category, header bars appear in the list, grouping the
items by category.
Note that since items can appear in any order, you will have
more than header for some categories unless you’ve sorted the list by category.
Assign categories by selecting the
Category choice in the Popup Item menu. In the resulting popup box, you can choose from the following
options:
·
Select an existing category
·
Create a new category
·
Edit the categories for the current list
Choose New Category
to quickly create a new category and assign it to the current item. You can also enter the name of an existing
category as an alternate way of assigning it. (New
in 1.2)
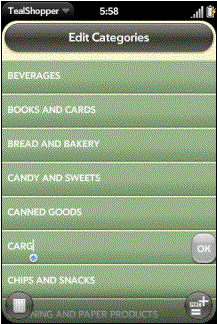 Choose
Edit Categories to edit the categories in the current list. Each list has its own set of independent
categories. You can also choose the Edit
Categories item in the List View’s application menu bar.
Choose
Edit Categories to edit the categories in the current list. Each list has its own set of independent
categories. You can also choose the Edit
Categories item in the List View’s application menu bar.
Select the Add button in
the lower right corner to create new categories.
Tap on existing entries to rename
them.
To delete categories, drag them
off screen to the right.
To delete all unused categories at
once, select the trashcan icon in the lower left. Categories that are assigned to one or more items will be
unaffected. (New
in 1.2)
Select “Add” from the drop down
application menu to add categories from the following preset lists: (New in 1.3)
- Groceries
- Household
- Packing
- Party
With the Category Lock in
the proper position, you can easily move an item into any category that has at
least one other item. Simply make sure
the Category Lock is set to OFF and drag the item to a new position
underneath the header of the category you wish to assign to it.
If you wish afterwards to return
the item to its original position, you can then turn the Category Lock
ON and drag the item back.
Each list maintains its own
independent set of Categories. To
specify which categories are initially created for a new list, select the Default
For New Lists > Categories choice from the application menu on the
main All Lists view.
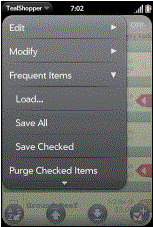
One of TealShopper’s most powerful features is the ability
to save commonly used items in a hidden list called the Frequent Items
List. Items can be copied here
from other lists and retrieved at any time, making it a handy place to store
staple groceries or other items that are needed again and again.
To add a single item to the Frequent
Items List, select the Save as Frequent Item choice from the Popup
Item Menu.
To
save multiple items, select the Save All or Save Checked
choices from Frequent Items application menu on the List View.
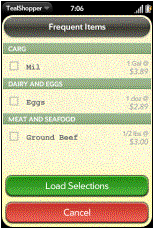
To
load items from the Frequent Items List, select the Load
choice from Frequent Items application menu. A list of available items will appear. Check the box next to the ones you wish to
load and select Load Selection to import them.
Items saved into the Frequent
Items List remember the name of any category they were originally
assigned. When importing a frequent
item, it will automatically be assigned to a matching category if one is found
with the same name. (New in 1.2)
To directly edit the contents of
the Frequent Items List, return to the main All Lists View and
choose the Edit Frequent Items from the application menu.
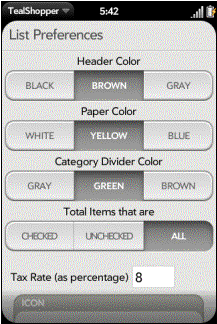
To customize how a list is displayed, select the Preferences
choice from the application menu on the List View. The following choices are available:
Select the color of the title bar
at the top of a list. Choose from
black, brown, or gray.
Select the paper color. Choose from white, yellow, or blue.
Select the color of the dividers
separating categories, if categories have been assigned. Choose from gray, green, or brown.
Choose how the total price at the
bottom of the list is calculated.
Choose from checked, unchecked, or all items. (New in 1.2)
Enter the rate used to calculate
sales tax. Enter the number as a
numerical percentage (e.g. 8.75, etc)
Select an icon to be shown next to
the list name in the All Lists View.
Choose from the following: (New in 1.2)
Each list maintains its own
independent set of Preferences. To
specify which categories are initially created for a new list, select the Default
For New Lists > Preferences choice from the application menu on the
main All Lists view. (New in 1.5)
To send a list via email, select one of the three email
options under the Export application menu while a list is open. (New in 1.4)
·
Email All
- Email
Checked
- Email
Un-checked
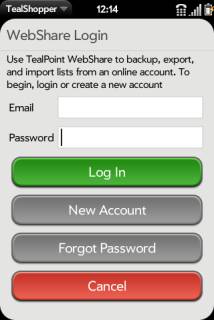 Use
the free TealPoint WebShare service to import, export, or backup your data with
our online data repository accessible from your PC web browser. (New in 1.5)
Use
the free TealPoint WebShare service to import, export, or backup your data with
our online data repository accessible from your PC web browser. (New in 1.5)
To access WebShare, select the Import/Export menu from the
All Lists Screen and choose one of two repositories:
My WebShare
Select My WebShare to import
or export lists from your own private password-protected data area.
Public Area
Select Public Area to browse
and import lists that other customers have chosen to share. You may also upload lists here, but anything
you upload will only appear after evaluation and approval from the WebShare
staff.
Before using WebShare, you’ll need
to create an account and password to protect your lists and private data. You’ll be asked to log into your account or
create a new one the first time you select the WebShare menu. You will stay logged in between WebShare
sessions until you explicitly log out.
When creating an account, enter
your email address as your WebShare login.
Be sure to use an account that is ready to accept email, as you will be
sent a confirmation message with a link you need to select before your account
can be used. Be sure to check any
“spam” or bulk mail folders for the confirmation message if you don’t receive
it.
If you forget your password and
need to change passwords, your account will be temporarily deactivated and a
new confirmation email will be sent out to reactivate it.
 When
logged in, the following choices are available:
When
logged in, the following choices are available:
Export List
Export one or more lists to your
WebShare account.
Import File
Import a WebShare file as a new
list in TealShopper
Delete File
Delete a file from your WebShare
account
Change Password
Change your WebShare account
password. You’ll be sent a new
confirmation email with a link to confirm the change and reactivate your
updated account.
Log Out
Log out
When you choose the Export
menu, you’ll be presented with a list of your current lists. Select the checkbox next to the ones you
wish to export and tap on the export button to send them to WebShare. Your files are stored based on their names,
so be sure all your list names are unique.
Symbols in the name are converted to underscores.
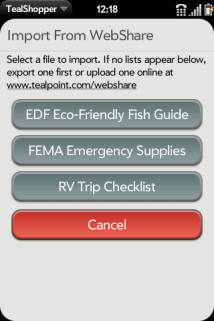
You can import any files you’ve
previously uploaded, either from your device or from your PC web browser
(below). Or, if you’re logged into the
public WebShare area, you can download any handy lists other customers have
uploaded.
You can access your WebShare
account online at www.tealpoint.com/webshare
. Here you can view, edit, create, or
cut and paste files for your handheld.
You can log into your account using your account name and password, or
onto the public account using the login public@public.public,
password public. Note that
anything you post in the public account won’t be immediately available.

When manually creating files for
import, it’s easiest to first export a list from your handheld and use it as a
template for new lists. TealShopper uses
the following text file format:
Items
List items appear as individual
lines with one item entered per line.
They may optionally be prefixed with square brackets ([ ]) or brackets
with an “X” in the middle to indicate a checked item.
Examples:
Apples
[]
Oranges
[
] Bananas
[x]
Mangoes
Quantities/Units/Prices
Quantities, Units, and Prices may
optionally follow a list item on the same line in the following format in
parentheses: (quantities units @ $price)
Examples:
[
] Apples (2 lb @ $1.99)
[
] Oranges (5)
[
] Bananas ($1.99)
[
] Mangoes (5 @ $1.99)
Notes:
Notes immediately follow a list
item, and appear between curly braces.
Notes may span multiple lines.
Examples:
[ ] Bananas
{ Don’t get mush ones }
[ ] Apples
{ This is a
multi-line note }
Categories:
Category
headers appear as a single line beginning and ending with a dash.
Examples:
- Produce -
[
] Apples
-
Household -
[
] Paper towels
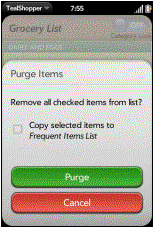
When a list is opened up for editing, use application menu’s
Purge choice to delete all checked items from the current
list. A confirmation dialog will
appear, giving you the option of automatically adding the purged items to the Frequent
Items List.
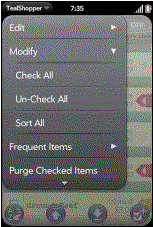
When a list is opened up for editing, the following advanced
operations are available from the application Modify menu:
Checks all items in the list
Unchecks all items in the list
Sorts items in the list. Same as selecting the sort button at the
bottom left corner of the screen. (New in 1.2)
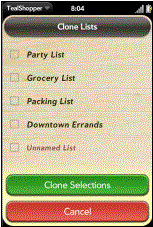
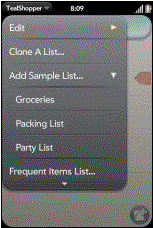
To make a copy of an existing list, go to the All Lists
View and select the Clone A List from that screen’s
application menu. On confirmation dialog will appear, letting you choose from
which lists to duplicate.
TealShopper includes a few built in lists you can use as
examples or as starting points for your own lists. To add a sample list, select Add Sample List from
the application menu.
Check out the WebShare Import/Export menu to
download additional free lists.
Version
1.5.1 – January 22, 2010
·
Added
new WebShare service for importing / exporting lists to free web account
·
Added
public WebShare area to download shared lists created by customers and TealPoint
staff
·
Added
option to specify default preferences for newly created lists
·
Improved
list memory footprint to improve navigation speed and loading
·
Fixed
crash selecting paste from edit menu
Version
1.4.0 – December 10, 2009
·
Added
new email export menu
·
Fixed
support for loading items from long frequently-used item lists
Version
1.3.1 - November 24, 2009
·
Added
menus on 'Edit Categories' screen to add pre-built items (groceries, household,
travel, party) to category list
·
Improved
list display to center on selected list item after moving it
·
Improved
display speed and memory footprint of long lists
·
Fixed
ability to cancel 'Delete' action on 'Edit Categories' screen
·
Fixed
ability to add new categories to 'Default Categories' screen
Version
1.2.0 – November 7, 2009
·
Added
option via button and menu to sort list items by name, category, flag, or
checked state
·
Added
option via button on Edit Categories screen to easily delete all unused
categories
·
Added
option via button in popup category menu to easily add new category by name
·
Added
option in preferences screen to calculate price totals from only checked or
unchecked items
·
Added
automatic adoption of category when adding new list item it item selected
·
Added
support for remembering categories in Frequent Items List
·
Added
support for user-selectable list icons
·
Added
support for Pixi screen resolution
·
Added
display of reminder flag in main list when list contains flagged items
·
Added
display of unchecked item counts on All Lists view
·
Added
display of shading above and below list when contents extend beyond display
bounds
·
Added
display of wait indicator when opening list
·
Improved
speed and list responsiveness throughout program
·
Improved
tax/total summary to automatically open Preferences screen if tapped
·
Fixed
category choice in Popup Items Menu to bring up category popup if no categories
defined
·
Fixed
cross-linked lists from being created if new list added after editing Frequent
Items List
·
Fixed
duplicate category header displayed when creating new item in middle of list
·
Fixed
lockup in new OS when selecting purge or preferences menus twice
·
Fixed
memory leak resulting in device sluggishness after extended use
Version
1.0.3 – October 12, 2009
·
First
published release
TealShopper by TealPoint Software
©2009 All
Rights Reserved.
TealPoint Software
454 Las Gallinas Ave #318
San Rafael, CA 94903-3618
We look forward to hearing from you.
Please visit us at www.tealpoint.com, or
email us at support@tealpoint.com.
TealShopper is available exclusively
through the Palm webOS App catalog.
Visit us online for our complete product line for webOS,
including:
( http://www.tealpoint.com/softshop.htm )
List and organize your shopping, tasks, and errands with
TealShopper, the supercharged list manager from TealPoint Software. With TealShopper, you can easily organize
your entries with drag and drop categories in an attractive, intuitive
interface.
To save time with commonly purchased items, you can save
them into a frequently-used items list and reload them at any time. Other tools let you flag important items,
make copies of lists, and customize each list's appearance and categories. Finally, to help plan your budget, you can
even enter product quantities and prices, and have your total automatically
calculated for you before you reach the checkout line.
( http://www.tealpoint.com/softtime.htm )
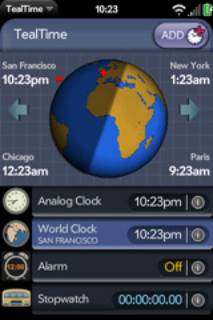
A powerful and versatile clock, alarm, and timer, TealTime
combines the functionality of a full-featured 3D World Clock, countdown timer,
stopwatch, alarm, and both digital and analog timepieces.
With a unique flexible interface, you can define which and
how many of each clock you want. Use it
to simultaneously show multiple time zones, create linked lap timers, or set
concurrent overlapping alarms.
( http://www.tealpoint.com/softsped.htm )
Do you find making calls too cumbersome? Wish the wave launcher had space for a few more
apps? Are your favorite songs or
documents too many taps away?
Coming to the rescue, TealSpeed is a multipurpose speed
dialer and secondary launcher screen for webOS. Use
TealSpeed to quickly access your commonly used phone
numbers, songs, web sites, and built-in applications*.
TealSpeed supports extensive customization options, and
even supports optionally adding icons to the system
dashboard. Like icons in the wave launcher, they can then
be popped up almost anywhere, giving you instant access to apps, songs, and
contacts. (* Third party applications
can also be launched, but require entering in an application's ID code from an
app's developer. TealSpeed has a built-in
database for known codes, and can access a growing online database of additional
codes.)
( http://www.tealpoint.com/softfish.htm )
 Enjoy the relaxing benefits of a freshwater
fish tank with none of the maintenance, mess, or hassle. The TealFishTank Aquarium Simulator displays
a beautiful tank of realistic-looking fish that move with a mixture of
autonomous and school-like behavior.
The fish scatter when you
tap the glass and chase food that you drop by tapping at the top of the
tank. They also sway a little in
response to phone movements, but this is not one of those apps that require you
to mimic all the real-world work that you're trying to avoid. Instead,
it offers some nice eye candy, so just sit back and enjoy!
Enjoy the relaxing benefits of a freshwater
fish tank with none of the maintenance, mess, or hassle. The TealFishTank Aquarium Simulator displays
a beautiful tank of realistic-looking fish that move with a mixture of
autonomous and school-like behavior.
The fish scatter when you
tap the glass and chase food that you drop by tapping at the top of the
tank. They also sway a little in
response to phone movements, but this is not one of those apps that require you
to mimic all the real-world work that you're trying to avoid. Instead,
it offers some nice eye candy, so just sit back and enjoy!
( http://www.tealpoint.com/softbaby.htm )
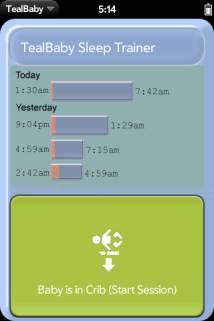
Train your baby to sleep through the night with the
TealBaby Sleep Trainer.
A progressive interval timer with a built in logging
function, the TealBaby Sleep Trainer is designed to assist in the various
flavors of the Ferber method, where a child is laid down to sleep and
periodically visited in ever-increasing intervals to encourage
self-soothing.
Features include user-selectable interval times, popup
alarm, and a built-in logging function so you can graphically monitor your
child's progress from session to session.
( http://www.tealpoint.com/softlevl.htm )

Taking utility to a whole new level, TealLevel includes
unique and invaluable features never seen before in a leveling app. Of course, your normal bubble-style levels
are there, and you even get a choice of paired “T” style levels or a round
bubble level with digital readout suitable for flat surfaces.
However, TealLevel also includes a vehicle and RV leveler
that calculates the necessary jacking or blocking heights for each tire. For flight enthusiasts, there is an
artificial horizon (gyro) display, perfect for keeping that “in-the-air”
feeling wherever you go.
TealLevel is fully configurable, allowing full
calibration so you can compensate for individual devices and cases. Best of all, there is a voice playback mode
you can enable by turn your handheld upside down. In this orientation, your data is then read aloud to you, letting
you take advantage of your phone’s flattest surface at the same time.
We at TealPoint Software are committed to
providing quality, easy-to-use software. However, this product is provided
without warranty and the user accepts full responsibility for any damages,
consequential or otherwise, resulting from its use.
This archive is freely redistributable,
provided it is made available only in its complete, unmodified form with no
additional files and for noncommercial purposes only. Any other use must have
prior written authorization from TealPoint Software.
Unauthorized commercial use includes, but
is not limited to:
§
A product for sale.
§
Accompanying a product for sale.
§
Accompanying a magazine, book or other
publication for sale.
§
Distribution with "Media",
"Copying" or other incidental costs.
§
Available for download with access or
download fees.
This program may be used on a trial basis
for 30 days. The program will continue to function afterwards. However, if
after this time you wish to continue using it, please register with us for the
nominal fee listed in the program.
Thank you.
CUSTOMER
LICENSE AGREEMENT
YOU
ARE ABOUT TO DOWNLOAD, INSTALL, OPEN OR USE PROPRIETARY SOFTWARE OWNED BY
TEALPOINT SOFTWARE, INC. CAREFULLY READ THE TERMS AND CONDITIONS OF THIS END
USER LICENSE BEFORE DOING SO, AND CLICK BELOW THAT YOU ACCEPT THESE TERMS.
1.
License. You are authorized to use the Software Product owned and developed by
TealPoint Software, Inc. on a single hand-held computing device on a trial
basis for thirty (30) days. If after 30 days you wish to continue using it, you
are required to register with TealPoint and pay the specified fee. This license
is not exclusive and may not be transferred. You may make one copy of the
Software for back-up and archival purposes only.
2.
Ownership. You acknowledge that the Software Product is the exclusive property
of TealPoint Software, Inc, which owns all copyright, trade secret, patent and
other proprietary rights in the Software Product.
3.
Restrictions. You may NOT: (a) decompile or reverse engineer the Software
Product; (b) copy (except as provided in 1 above) sell, distribute or
commercially exploit the Software product; or (c) transfer, assign or
sublicense this license.
4.
Disclaimer of Warranty and Liability. TEALPOINT MAKES NO WARRANTY, EXPRESS OR
IMPLIED, AS TO THE ACCURACY, COMPLETENESS OR FUNCTIONING OF THE LICENSED
SOFTWARE, INCLUDING WITHOUT LIMITATION, WARRANTIES OF MERCHANTABILITY OR OF
FITNESS FOR A PARTICULAR PURPOSE, ALL OF WHICH TEALPOINT DISCLAIMS. ALL
LIABILITY IS DISCLAIMED AND TEALPOINT ASSUMES NO RESPONSIBILITY OR LIABILITY
FOR LOSS OR DAMAGES OF ANY KIND, DIRECT OR INDIRECT, INCIDENTIAL, CONSEQUENTIAL
OR SPECIAL, ARISING OUT OF YOUR USE OF THE LICENSED SOFTWARE, EVEN IF ADVISED
OF THE POSSIBILITY THEREOF.
5.
Termination. You may terminate this Agreement at any time by destroying your
copy(ies) of the Software Product. The Agreement will also terminate if you do
not comply with any of its terms and conditions, at which time you are required
to destroy your copy(ies) of the Software Product and cease all use.
6.
Applicable Law. This Agreement is governed by the laws of the State of
California.