
TealDesktop User's Manual
Program Version 1.24
Last Updated: April 17, 2008
Table of Contents
Introduction
Contents
Terms used in this document
Chapter 1 – Getting Started
What makes TealDesktop different?
Power
Themes
Customization
Installing
Launching
Chapter 2 – Choosing Themes
Selecting Themes
Where to get Themes
Standard Themes
Standard View
Standard List
Standard Big
Standard Tiny
Standard Tools
Bundled Themes
Final Frontier
Classic Mac
Classic PC
Bubbles
Notebook
Add-On Themes
Recreating Standard Themes
Chapter 3 – Using Categories
Three ways to set file categories
Method 1: Use File
Category Screen (RAM)
Method 2: Choose from
Popup Menu (RAM)
Method 3: Drag to Tab
(Both RAM and Cards)
Editing Ram Categories
Hidden Categories
Category Order
Editing Card Categories
Chapter 4 – Managing Files
Deleting
Beaming/Sending
Copying/Moving
Information
Renaming Icons
Private Icons
Chapter 5 – Customizing Views
Backgrounds
Image Sizes
Image Placement
Colors
Fonts
Chapter 6 – Custom File Types
Specifying Custom File Types
Opening Custom File Types
Chapter 7 – Advanced Tools and Options
Scanning Files
Preferences
Start category
Fancy fonts
Use TealDesktop as default launcher
Hide standard launcher
Force 16-bit mode
Add card number to card categories
Clear icon text backgrounds
Draw icon text half-sized
Chapter 8 – Theme Editor:
Introduction
Overview
Screen Elements
Customization Values
Creating a New Theme
Saving Changes
Chapter 9 – Theme Editor:
Customization Values
Theme Background
Theme Colors
Theme Fonts
Theme Icons
Icons:
Effect:
Scrolling:
Safe-area border:
Chapter 10 – Theme Editor:
Screen Element Overview
Selecting Elements
Positioning Elements
Ordering Elements
Copying/Pasting Elements
Creating New Elements
Chapter 11 – Theme Editor:
Screen Element Properties
Graphic Properties
Rectangle
Rounded Rectangle
3D Rectangle
Oval
Tab (up, down, left, or right)
Battery Graph (horizontal or vertical)
Memory Graph (horizontal or vertical)
Polygon
Scroll Bar (horizontal or vertical)
Text Properties
Time (long or short)
Category Name
Date (long, medium, or short format)
Day of week (long or short)
Icon page number (e.g 1 or 1/2)
Battery level (percentage)
Battery voltage (current, warning, or critical)
Memory (percent)
Memory (free, used, or total bytes)
HotSync User Name
Device Serial Number
Volume level (system, game, or alarm)
Beam enabled (on/off)
Secret record state (show, hide, mask)
Application Icon Elements
Category Elements
Pick Lists
Tabs
Buttons
Rectangles
Gadget Elements
Popup apps list / apps in category
Popup prefs panel
Popup DA lists
Popup system clock
Popup TealGlance
Toggle backlight
Toggle beam enable
Adjust brightness
Adjust contrast
Adjust system/game/alarm volume
Page previous/next
Page horizontal/vertical scroll
Category previous/next
Category goto
Category list
Show menu
Show/hide private records
Lock handheld
Turn off handheld
File beam
File send
File info
File delete
File copy/move
Launch named application
Launch named prefs panel
Launch named DA panel
Visual Elements
Chapter 12 – Theme Editor: Full Screen Modes
Automatic size/position adjustment
Hidden objects
Coordinate tweaking
Chapter 13 – Theme Editor: Advanced Hints
PalmOS Simulator
Key Shortcuts
Simulator Version
Extracting Data
“Lost” Elements
Optimizing for speed
Chapter 14 – Custom Icon Bitmaps
Exporting
Editing
Importing Icon Bitmaps
Icon Sets
Appendix A –
TealPoint Image Manager
Step 1 – Select a Database File
Step 2 – Preview images
Step 3 – Import or Export Images
Importing an Image
Maintain proportions when scaling
Dither image pixels
Importing Multiple Images
Exporting Images
Single image to named file
Multiple images to base filename plus numbers
All images using image labels as filenames
Step 4 – Other Actions
Printing an Image
Install Database
Appendix B – TealPoint File Manager
Moving/Copying Files
Appendix C – TealPoint Pen-Free Navigation
Appendix D – Products
Appendix E –
Revision History
Appendix F – Contact Info
Appendix G – Registering
Legal Notice
Introduction
Thank you for trying
TealDesktop, the powerful and customizable application launcher for PalmOS
handhelds.
Contents
This archive contains the
following files:
Handheld
Program files:
TEALDESK.PRC The
TealDesktop program file (for direct install)
FONTBUCKET.PRC FontBucket
add-on font manager
Desktop
Program files:
IMAGEMGR.EXE Image Database import utility
(Windows, optional)
TPSETUP.EXE Easy-installer
program (Windows, optional)
Content
files:
FBFONTS.PDB Optional
set of add-on fonts
Document
files:
DESKDOC.PDF This
document in Adobe Acrobat (PDF) format
DESKDOC.HTM This
document in HTML format (sans images)
DESKDOC.PRC This
document in TealDoc format
REGISTER.HTM TealPoint
Registration form in HTML format
REGISTER.TXT TealPoint
Registration form in text format
Terms used in this document
Hardware Buttons:
The four physical buttons (e.g.
date, address, todo, and memo) typically located in a row at the bottom of your
handheld
Scroll Up/Down Buttons:
The physical rocker switch at the
bottom center of the handheld
Five-way control:
On newer handhelds, a 5-way
control replaces the scroll up/down buttons, adding left and right movement and
a center select button.
Graffiti:
The special letter-like symbols
you write to enter text with your stylus.
Graffiti Entry Area:
The rectangular area at the bottom
of the display screen where you can write letters in graffiti.
Silkscreen Buttons:
The four printed circular tap
areas (Home, Menu, Calculator, and Find) to the left and right of the graffiti
drawing area.
Menus:
The drop-down menus you get when
tapping on the silkscreen menu button, or tap on the title bar (if present) on
a device running PalmOS 3.5 or higher.
Chapter 1 – Getting Started
What makes TealDesktop different?
TealDesktop replaces the
standard system launcher, offering unmatched new features and expanded
versatility:
Power
TealDesktop supports tabbed categories, multiple card folders,
launching documents, drag and drop, context-sensitive menus, background images,
fill patterns, and much more.
Themes
Unlike
the simple “skins” provided by some launchers, TealDesktop Themes
allow a whole new level of customization.
Themes not only change the look and layout of the screen, but can
completely rewrite its functionality as well, determining what elements are on
screen, where they are located, and what they do. You can even assign a completely different theme to each category
if you wish.
Customization
TealDesktop
allows you to easily customize the fonts, colors, and backgrounds of each theme
on a category-by-category basis. For
low-level customization, a full Theme Editor is even included so
you can make or modify your own creations.
Installing
On a
Windows PC, you can use the quick setup installer by double clicking on the TPSETUP.EXE
installer program, and following the on screen prompts.
For
other systems, (Macintosh, Linux, etc), manually install the necessary files:
1)
Install Program

Use the Palm Install Tool that
comes with your organizer to install the program file TEALDESK.PRC into Handheld Main
Memory. The Palm Install Tool can be found as an icon along the left
hand side inside the Palm Desktop program on your desktop computer. Instructions on how to use the Palm install
tool are in the Palm Handbook or electronic manual that came with your Pilot,
PalmPilot, Visor, CLIE, or WorkPad.
2)
Install Fonts
Install
FONTBUCKET.PRC if you wish to
support add-on fonts, and FBFONTS.PDB
for our own selection of fonts we’ve hand-optimized for use with TealDoc. Visit Hands High Software for additional
fonts or tools to convert your own fonts from your Mac or PC desktop.
3)
Install Documents
You can
optionally also install DESKDOC.PRC, a copy of this document in Palm
“Doc” format suitable for reading with a Doc reader like TealDoc.
The
TealPoint Desktop Image Manager (IMAGEMGR.EXE) does not require any installation. Just copy the EXE file to a location on your
hard drive and double-click on it to run.
Launching
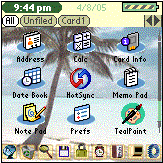
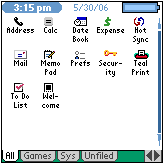
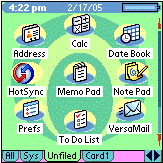
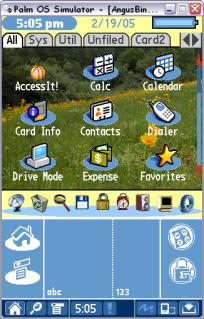
![]()
To run TealDesktop, tap on its icon in the standard device
launcher screen.
After
you get used to TealDesktop, you’ll probably want it come up instead of the
standard launcher.
You can
set this by turning on the Use TealDesktop as Default Launcher
option in the TealDesktop Preferences screen.
Chapter 2 – Choosing Themes
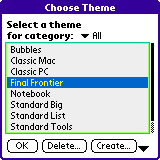
To change the current theme, select the Choose Theme
selection from the Themes drop down menu. A list of available themes will appear.
Selecting Themes
In
TealDesktop, every category tab can have its own theme. This is useful, but it can be a little
disconcerting to have the screen jump around when changing categories if the
themes are too dissimilar.
A pick list at the top of the theme selection screen chooses which tab receives the theme you choose. Choose “All Tabs” (distinct from the “All” tab) to load a single theme into all tabs in one step.
Where to get Themes
When you first install TealDesktop, some themes will
automatically be available. Four Standard
Themes are built into the program and can always be recovered even if
you delete them.
A number of additional Bundled Themes will also
appear. These install with the main
application, but if you delete them you’ll have to reinstall TealDesktop or
individually install each theme to recover them.
Add-On Themes are the last category.
As we and other customers come up with new theme ideas, we hope to share
them with you and make them available for download off the TealPoint Software
site. Look for additional add-on themes
and background images on the TealDesktop software page at www.tealpoint.com.
Standard Themes
TealDesktop supports four
standard themes. It knows how to make
these internally, so even if you delete one of them, you can recreate it by
choosing the Create option (described later in this chapter) in
the Theme Select Screen:
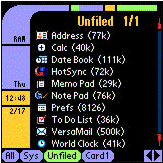
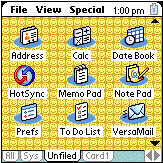
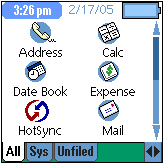
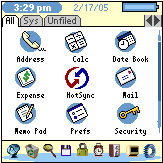
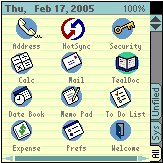
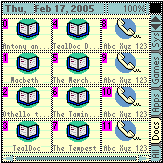
Standard View
The
View theme is designed to closely resemble the default layout of the Standard
launcher. Instead of a category pick
list, however, a category tab bar is present at the bottom of the screen.
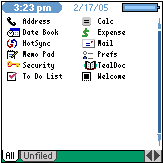
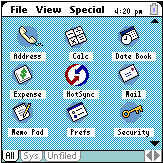
Standard List
The List theme (and its “tools” variant) is designed to closely resemble
the “list” style view of the Standard launcher, showing the alternate “list”
icon for each program (if defined), allowing for a compact, concise view.
Standard Big
The Big theme is a new special theme
designed with big buttons and text for easily mobile access or the visually
impaired.
Standard Tiny
The Tiny theme (and its “tools”
variant) uses small icons to fit more items in the display screen.
New in 1.20
Note: If upgrading to 1.20 from
an earlier version, use the “Create” button in the “Choose Theme” screen to
create the tiny theme.
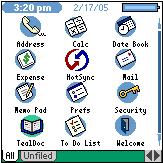
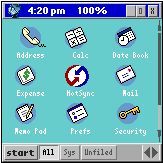
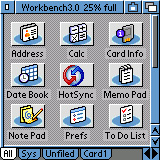
Standard Tools
The
Tools theme is an expanded option with a row of toolbar icons for common system
functions. These icons can have
different purposes in different themes, but here they perform the following
functions (from left to right):
![]()
File
Beam Drag a file here
to beam it or tap on this button to bring up the File Beaming
screen.
![]()
File
Delete Drag a file here
to delete it or tap on this button to bring up the File Delete
screen.
![]()
File
Information Drag a file here to
show information for it or tap on this button to bring up the File
Information screen.
![]()
File
Copy/Move Drag a file here to
copy it, or tap on this button to bring up the File Copy/Move
screen.
![]()
System
Lock Tap on this button to
lock the device using the Standard Security application or TealLock
(if present).
![]()
Alarm
Volume Tap on this button to
adjust the PalmOS alarm volume.
![]()
System
Volume Tap on this button to
adjust the PalmOS system volume.
![]()
Favorites
1 Tap this button to
launch a pre-programmed application, or hold it down to change which app to
launch.
![]()
Favorites
2 Tap this button to
launch a pre-programmed application, or hold it down to change which app to
launch.
Bundled Themes

Final Frontier
The
Final Frontier theme showcases the visually entertaining power of
TealDesktop. When operating in “wide”
landscape mode on devices that support this display format, the extra screen
space is used for extra bonus system adjustment tools. The bar graphs at the top of the screen are
functional memory and battery indicators.
Classic Mac
The Classic Mac theme nostalgically brings
back the look of everyone’s favorite “toaster” of the mid-late 1980’s.
Classic PC
Want a “familiar” interface on your handheld? The Classic PC theme brings you this while
keeping the ease of use of PalmOS.
Complete with a functional start menu, the title bar icons are
functioning beam, info, copy, and delete buttons.
Bubbles
The Bubbles themes is a colorful layout
that showcases TealDesktop’s ability to create graphic backgrounds from simple
primitives and use non-linear icon layouts.
Notebook
The Notebook theme demonstrates use of a
sideways rotated category tab bar combined with icon pages that scroll
horizontally instead of vertically.
Five-way controllers work differently while in this theme (up and down
change categories while left and right scroll icons), so this theme is usually
best used when all categories are set to a “sideways” theme as well.
Add-On Themes
The
availability of Add-On themes and background images continues to change. The experimental “Classic Amiga” theme is
shown. Check the TealDesktop page on
the TealPoint Software web site to see the latest themes and background images
we or customers have posted for download.
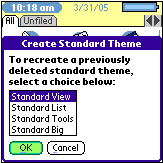
Recreating Standard Themes
If you delete a standard
theme to make space and later want to restore it, or want to undo changes made
to a standard theme, select the Create button in the Theme
Selection screen. You’ll be
presented with a list of standard themes to create.
Chapter 3 – Using Categories
Like
the standard system Launcher, TealDesktop allows you to place applications in
named organizational categories to make them easier to find. TealDesktop goes further, however, in
allowing categorization of card-based files and giving many convenient ways to
arrange icons and place them into categories.
Three ways to set file categories
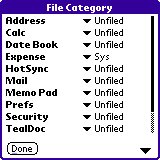
Method 1: Use File
Category Screen (RAM)
The most familiar way to move applications into categories is using the File Category Screen reachable from the Category drop down menu. This screen lets you set categories for files in Main Memory using drop down pick lists and mirrors the way the standard launcher works.
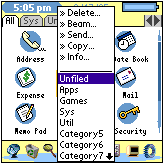
Method 2: Choose
from Popup Menu (RAM)
An easier way to set an app’s category is to hold the pen down on the app’s icons until the Popup File Menu appears. Just select a new category for the app from the list. You can also choose to delete, beam, or carry out a number of other common actions on the file.

Method 3: Drag to
Tab (Both RAM and Cards)
The easiest way to move a file
into a non-empty category is to simply drag it to the category’s tab. This works even if you’re dragging a file
from memory to a card or the other way around; you’ll simply be asked to
whether you want the file to be “Moved” to the new location or just “Copied”
there.
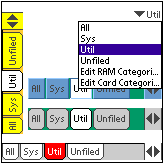
Editing Ram Categories
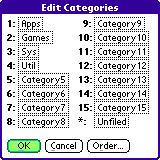
To edit
the list of categories, choose Edit Ram Categories from the main
drop down menu.
Tap on a category name to modify it.
TealDesktop uses the PalmOS
standard category mechanism, which supports up to 15 named categories and one
“unfiled” category. Categories are
automatically hidden if they do not contain any files

Hidden Categories
You can also optionally hide any
single category by tapping on the name and selecting the Hide this
category option. The category
then will not appear as a tab or selection from on-screen category
selectors. It will still be available
for placing files into and from the main menu.
Category Order
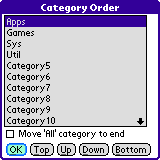
Unlike
PalmOS, you are not restricted to keeping your tabs in alphabetical order. To change the order that categories appear
in the list of tabs, tap on the Order button to bring up the
Category Order screen.
On this screen you can also choose
to move the “All” category to the end of the list of RAM categories.
(New in 1.10)
Editing Card Categories

Select Edit
Card Categories to define categories to use for external storage cards
such as SD, MS, and Compact Flash.
Card Folders
Card
categories work a little bit differently than ones in RAM because they can take
advantage of the subfolders that external storage cards support.
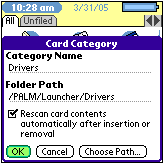
Tap on a category to set
its properties.
In TealDesktop, you name a number of card categories
and set a subfolder path that each category corresponds to. Whenever a card is inserted that contains a
listed subfolder, the corresponding card category tab will appear. Use the Choose Path button to
select an existing folder path, or the Folders button on the Edit
Card Categories screen to view and create new subfolders.
Swapping Cards
Card
categories work a little bit differently than ones in RAM because they can take
Using this mechanism, you can set things up so that different categories appear
depending on what physical card you insert.
For instance, you can set up both “Games” and “Maps”
categories, but have different physical cards; one with a games subfolder, and
another with a folder containing maps.
If you switch cards, the tabs will change automatically, and any folders
will be scanned for new content if the Rescan card contents
option is selected for that category.
NOTE: Unlike RAM
categories, card categories appear whenever a corresponding folder path exists
on a card, even if no files are present in that folder path.
HINT: By default,
the standard system launcher and Palm Desktop only recognize the /Palm/Launcher
subfolder. You probably want to keep
one card category mapped here so you can find files installed to the card by
the Palm Desktop.
Chapter 4 – Managing Files
Deleting
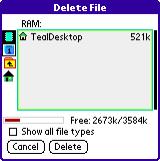
Choose the Delete drop down menu to delete files from your
handheld. You can also delete an
individual file by holding down the pen to bring up the Popup File Menu, or
dragging the file to a Trashcan toolbar icon (if supported by the current
theme).
You can
delete any writable file off your handheld; not just applications. Check the Show all file types
to access other files.
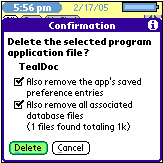
When deleting applications, you
can optionally choose to delete the program’s related data files and settings
saved in the system preferences database.
A program’s data files and settings are identified as any files having
the same Creator ID value as the application.
Normally, you want to leave
these options checked. If so, the
delete operation will act like the standard system Launcher.
Beaming/Sending
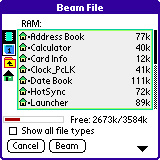
Choose
the Beam or Send drop down menus to transfer files
from your handheld. You can also move
an individual file by holding down the pen to bring up the Popup File Menu, or
dragging the file to a Beaming icon (if available).
You can transmit any file from
your handheld or an external card.
Check the Show all file types to access other files.
Copying/Moving

Choose
the Copy drop down menu to move or copy files to or from external
cards from between different folders on the card. You can also move an individual file by dragging its icon between
category tabs, even card-based tabs.
Information
Choose
the Info drop down menu to get the size, record-count, or version
of files on your handheld or external cards.
You can also get information about an individual file by holding
down the pen to bring up the Popup File Menu, or dragging the file to an
Information icon (if available).
Renaming Icons
When
you show information on an individual file, you have two additional options;
the ability to rename the icon as it appears in TealDesktop, and to mark the
icon as “Private”. Renaming the icon
only changes how it’s icon is labeled; it does not change the program itself or
affect any functionality.
Private Icons
A
private application’s icon will not appear if PalmOS private records are hidden
or masked. This is a simple way to hide
some applications from easy view.
NOTE: Only TealDesktop supports the “Private” property. If used, you probably want to make the
standard launcher (called “applications”) private as well so someone cannot
easily run it to see the hidden applications.
Chapter 5 – Customizing Views
Backgrounds
Use the Customize Backgrounds screen to customize
the background image, colors, or fill pattern for the current category view.
Images
should be in TealPaint format, and can be created using TealPaint
or the include TealPoint Image Manager (see Appendix).
Image Sizes

The primary image should be either 160x160 (lo-res) or 320x320
(hi-res).
If your
handheld is capable of a portrait or landscape full screen mode, you may also
wish to respectively add 160x80 (320x160 hi-res) or 80x160 (160x320 hi-res)
images to fill in the extra space when in those
modes.
Image Placement
The
extra images can be designed to fill in the left, right, top, or bottom sides
of the display when the screen is expanded.
This flexibility allows you to draw interface elements into the
background image and keep them aligned with controls as they move. For instance, if you draw buttons into the
bottom of the primary image that should move down with an expanded display, you
should set an extra portrait image to fill the “top” of the display area so
that the normal display bitmap is forced downwards when in full screen mode.
For
best results and drawing speed, be sure to match the depth of the images to
TealDesktop. By default, most devices
run in 8-bit mode. You can override
this to 16-bits using the TealDesktop Preferences Screen.
If
images are not selected, you can create a custom fill pattern of two colors by
tapping on the grid at the bottom of the screen, or select 'Reset' to clear all
image fields and patterns back to their default values defined in the original
theme file.
Colors

Open
the Customize Colors Screen to customize colors for the current
theme and category. Tap on a color to
customize it for the current category, or select 'Reset' to restore colors to
their theme defaults.
Fonts
Open
the Customize Fonts Screen to customize fonts for the current
theme and category. Tap on a font to
customize it for the current category, or select 'Reset' to restore fonts to
their theme defaults.
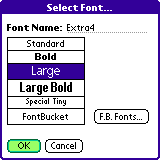
TealDesktop supports the basic set of standard system fonts and
a new “Special Tiny” custom font. It
also supports user-added FontBucket fonts if you have FontBucket (freeware at www.handshigh.com) installed.
Chapter 6 – Custom File Types
One of TealDesktop’s more
powerful features is the ability to select and launch documents and data files
as well as applications. This is done
using the Custom File Types Screen.
Specifying Custom File Types
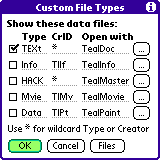
Use the
Custom File Types Screen to specify and enable support of data files.
File
types are specified type Type and CreatorID, two
four-letter properties associated with every PalmOS-format file.
Files
of a certain type usually have a common Type and the same CreatorID as the
program meant to open them. There are
some exceptions, however, especially for files meant to be shared between
programs. There is no central database
of what files correspond to what Type and CreatorID values, and we have no
information on files from other companies.
However, can usually deduce codes using the Files button to view the
Type and CreatorID of files on your handheld.
Opening Custom File Types
Once you’ve specified a custom
file type, you must also associate an application with that file type. The application will provide not only the
icon image for that type of file (since data files do not contain icon
information), but will be called to open the data file should the file’s icon
be selected.
The file you specify can be in
memory or on an external storage card.
When the data file or document is “run”, TealDesktop will look both in
memory and on all card folders for the named application. If found, it will make a temporary copy of
the data file in memory (if it’s on a card) and launch the application to open
the data file.
NOTE: The name of the data file will
be passed to the application using the Palm OpenDB launch
code. Most document readers, but not
all, will recognize this code and automatically load up the specified document
or data file. If not, the application
should still launch but will not automatically open the selected file. You may wish to contact the developer of the
application to add support for the needed launch code.
Chapter 7 – Advanced Tools and Options
Scanning Files
When TealDesktop scans files, it
looks on the current device (card or memory) for any changes in applications
and selected file types, and updates the icon list to reflect them. Normally, this process is automatic,
occurring after a HotSync, device reset, or card insertion, but you can turn it
off for individual card categories with the Rescan card contents
option if the contents of the corresponding card folder are not likely to
change.
You can also force rescanning manually to reflect programs deleted using other applications or beamed onto the handheld. Choose the Scan for changes to automatically look for new files or remove any old icons, or Force full scan to not only look for changes, but to refresh the icon images and names of all existing programs just in case some of them may have changed.
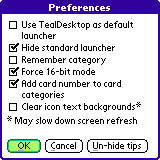
Preferences
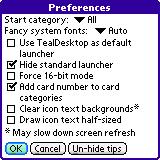
Select Preferences to bring up the preferences dialog for
options to fine tune how TealDesktop works.
The
following choices are available:
Start category
Selects
which category to use whenever TealDesktop is launched. A specific category can be selected, or
choose “Last Category” to tells TealDesktop to restore the last-accessed
category each time you return. (New for 1.18)
Fancy fonts
Selects
new “thin” system fonts on high-resolution devices for a clean modern
look. Choose “All” to enable thin fonts
universally, or “Auto” to leave buttons with standard heavy fonts. Turn off fancy fonts if using a third-party
font-remapping program, however, as font remappers only support standard system
fonts. (New
for 1.24)
Use TealDesktop as default launcher
Tells
PalmOS to call TealDesktop instead of the standard launcher when the launcher
buttons are activated in writing areas, keyboards, or the status bar, if
present.
Hide standard launcher
Hides
the icon for the standard launcher (Applications) in TealDesktop.
Force 16-bit mode
PalmOS
default to 8-bit mode on most color devices.
Use this option to force TealDesktop to use a 16-bit display mode (if
supported) to better reproduce images and smooth colors in background images.
Add card number to card categories
If set,
a card number is added to the end of card-based folders to distinguish them
from each other on devices with an internal card or more than one card
slot. Card numbers refer only to
mounted cards, not physical card slots.
Clear icon text backgrounds

Normally, the text for icons is drawn with both a foreground
color and a background color. The
latter is used to draw a solid box around the text for better readability.
If this
option is set, the box is removed, leaving only the raw text. This option can nicely clean up the
background behind icons, especially when using a background image, but can
hinder screen redraws on slower devices due to additional graphic processing
involved.
Draw icon text half-sized
On
high-resolution devices, this option tells TealDesktop to draw the text for
icons half of its normal size. On
low-resolution devices, this option has no effect. (New
for 1.18)
Chapter 8 – Theme Editor: Introduction
The TealDesktop Theme
Editor gives you the lowest level control over the look and
functionality of the program. Using it,
you can modify existing themes or create your own for personal use, for free
distribution, or even for sale to others.
NOTE: Use of the theme editor
is a powerful but moderately technical.
This section of the manual assumes a minimal degree of technical
sophistication, as does the editor itself.
We do not recommend use of the editor for novice users and cannot
provide tutoring for topics already covered in this manual.
Overview
The
theme editor allows you to create or edit theme files. Theme files are templates that consist of
two parts: Screen Elements,
and Customization Values.
Screen Element define where various items go on the screen and how they
function, while Customization Values set global parameters like colors, fonts,
and control mappings.
Screen Elements
Screen Elements are
all the little widgets you interact with on the display. This includes program icons, category
selectors, scroll bars, and buttons. It
also includes non-interactive elements, such as title bars, battery level
indicators, and even purely decorative graphic shapes that are drawn with basic
graphics primitives. In the Theme
Editor, you have complete control over all of these, individually placing
and sizing them and determining how they move if the display is resized.
Customization Values
Customization
Values include general properties for how
TealDesktop should function when a theme is active. Many of these, including color, font, and background settings,
can be overridden by the end-user on a category-by-category basis. Others, such as control mappings, or icon
effects, however, are stored in the theme and cannot be changed outside the Theme
Editor.
Creating a New Theme
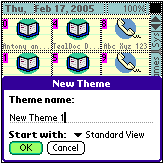
To
create a new theme, select Create New from the editor main
menu. You’ll be asked to pick a unique
new name for the theme. You can create
a theme as a copy of an existing theme, as a copy of one of the standard themes,
or as a blank theme that has no Screen Elements.
Saving Changes
When you’re done editing a
theme, just select Close Theme Editor to return back to the main
screen. There’s no need to explicitly
save changes as they’ve been saved all along.
NOTE: if you made changes to Customization Values in the Theme
Editor, those changes may not be immediately reflected in categories
already using the theme you’ve just edited.
To get these categories to adopt the new “default” values that you’ve
set, select Reset in the main Customization screen
for that category, or reload the theme into that category after temporarily
changing the theme to something else.
Chapter 9 – Theme Editor: Customization Values
When creating a new theme,
avoid the tendency to jump into creating screen objects without first thinking
about Customization Values.
While some settings, such as background and icon effects, can be set at
any time, others, such as fonts and colors, determine the choices available to Screen
Elements. Plan ahead to make sure
the colors and fonts you need will both be available for use and easily
editable by the end user if your theme is for wide distribution.
Theme Background
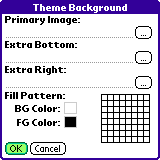
The Theme Background
screen is essentially identical to the Customize Background screen used
outside by the end user. Settings you
select here determine the default settings used when a theme is first loaded or
when the Reset button is used on the Customize Background screen.
Theme Colors
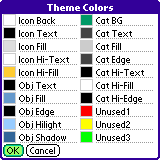
The Theme Colors screen
is similar to the Customize Colors screen used outside the editor by the
end user. In it, you get to not only
define which color fill each of 20 color slots, but you can name each slot,
hinting to the end user how the color is to be used in the theme.
HINT: Avoid the tendency to just simply assign one slot for every
color you plan to use. Instead, think
of color usage “groups” that the user might want to change independently. For instance, your default color scheme
might, say, use the same blue for both icon labels and the title bar. If you want to give the user flexibility to
change these independently, however, you should assign two color slots (naming
one “title bar” and the other “icon text”) and assigning them both to the same
blue color.
Theme Fonts
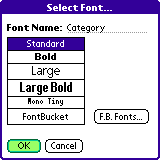
The Theme Fonts screen
is similar to the Customize Fonts screen used outside the editor. In it, you select a font in each of 10 font
slots. When you get to the actual font
selection screen, however, you can also change the name of each font slot.
As with the Theme Colors
screen, try splitting font usage into functional named groups to improve user
customization, even if you assign them to the same default font initially.
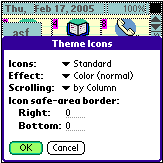
Theme Icons
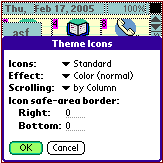
The Theme Icons screen
has not counterpart outside the editor.
In it, you can set general properties for how icons are drawn or used in
the theme.
Icons:
PalmOS applications normally
contain two groups of icon images. The first is a 32x20 main icon to be used in
the standard launcher’s “Standard” view.
The second is an optional 15x9 icon to be used in the “List” view. Each group contains multiple images to be
used at different resolutions.
In TealDesktop, you can select
whether to use the “Standard” icon or the “List” icon (if present) for
applications in a theme. On
high-resolution devices, you can also alternatively show the standard icon
half-sized (16x10). When this option is
selected on a low-resolution device, the list icon is used instead.
HIGHLIGHT: In other launchers,
icons are occasionally drawn with a solid white rectangular background. This sometimes occurs because the
application developer did not set the icon’s transparency bit. Other times, this is done on purpose for
compatibility sakes because PalmOS’ older 16-bit icon format didn’t support a
transparency option, and files using the new format can crash older
devices. TealDesktop automatically
fixes both problems by filling in an icon’s corners with transparency if it
detects the icon being completely surrounded by a white border.
Effect:
While rarely used, TealDesktop
has the ability to perform color effects on icon images. Icons can be made grayscale, tinted sepia
toned, converted to black and white (sketch or dither) or rendered as a film
negative.
Scrolling:
Icons can be freely laid out in
horizontal rows, vertical columns, or free form layouts that don’t have a
regular column or row count. This
selection lets you specify the minimum increment used to scroll through icons
so you don’t find them jumping inappropriately from column-to-column or
row-to-row. Set By Row if icons
are in a regular grid that scrolls vertically, By Column if it is in a
regular grid that scrolls horizontally, or By Page if icons are in a
freeform shape that should scroll only by an entire page at a time.
Safe-area border:
Some devices support a “full
screen” mode that lets you expand the display area vertically or horizontally
by removing the Graffiti writing area.
For these devices, TealDesktop lets you place extra controls and icons
to the right or below the normal “safe” display area, where they are
automatically hidden in “non-full” display modes.
The save area border
lets you contract the “safe” display area, hiding icons on the bottom or right
borders of the screen if the display is not in an expanded mode. This is typically useful only when dealing
with small “list” icons.
HINT: Don’t worry about this
feature for now. When you need it,
you’ll know it.
Chapter 10 – Theme Editor: Screen Element Overview
Screen
Elements are individual “widgets” that
you place onto the display area. Each
element has a rectangular “bounding” box that defines both where the object
draws and where it responds to clicks (if it is interactive). Elements also have a depth that is
linked it its relative order in the big list of elements for the theme. This depth determines which object
draws on top of another, and which receives a click when they overlap.
Selecting Elements
When inside the Theme Editor,
TealDesktop operates in one of two modes:
Test Mode and Select Mode. In test mode, elements operate normally,
except that all categories are mapped to the current theme, unused icons are
filled with a default icon, and some operations are disabled.
In Select Mode, by
contrast, bounding boxes are shown and a single “selected” element is
highlighted. Icon object show an additional
Icon Number indicating the order programs will be filled into the
icons. Tapping on an element changes
the current selection.
To toggle between Test and
Select modes, just tap on an unused area or choose the Toggle Select/Test
menu.
Positioning Elements
To position an element, simply
highlight it in Select Mode and drag it to the new location. To resize it, drag the resize box in
the lower right corner of the selected object.
For finer control, highlight an
element or its resize box and use a 5-way control or keyboard arrow keys
to make changes one coordinate at a time.
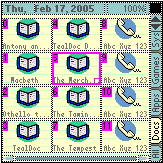
For exact control, use the Element
Position screen to enter numerical values. This screen also contains many options to optimize for full
screen mode described in a following chapter: Full Screen Modes.
HINT: Screen Elements
are placed using PalmOS Standard Coordinates, which matches the
coordinate system used if the device were low resolution. Thus, the normal square display area always
ranges from 0-159 pixels by 0-159 pixels, even if the display is high
resolution.
Ordering Elements
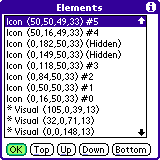
The relative order of screen elements in the Global Element
List determines how they draw and respond to taps.
Elements near the top of the
list are drawn in front of other overlapping elements, and receive precedence
in receiving pen taps.
For icon elements, the order
also determines how individual programs are placed alphabetically, and should
read from bottom to top as the reading order a customer is likely to expect.
To manually order elements, use
the Select/Order menu to bring up the element list, which shows
elements by type and screen coordinates (x,y,w,h).
HINT: TealDesktop caches the
images of static background objects for faster redrawing. Try to group non-interactive visual elements
at the bottom of the list to help this.
Visual elements that will be cached are shown with an asterisk before
their name.
Copying/Pasting Elements
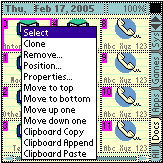
To copy or paste one or more objects within, or between, themes,
tap and hold on a selected object. The Popup
Element Menu will appear, giving common actions to perform.
Three additional menus exist
only here. Select Clipboard Copy
to copy the current element, or Clipboard Append to add the
current element to a list of previously-copied elements. Select Clipboard Paste to
insert all copied elements into the current theme.
NOTE: If copying between
themes, some adjustment will be necessary if font and color lists are not
identical between the themes.
Creating New Elements
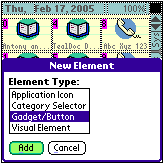
Select Add New to
create a new element in the current theme.
Select an element type and select Add to bring up the
element Properties Screen for that element type. Details on adjusting each element type
appear in the next Chapter.
Chapter 11 – Theme Editor: Screen Element Properties

TealDesktop supports four basic
element types:
·
Application Icons
·
Category Selectors
·
Gadgets
·
Visual Elements.
All four have special
properties you can adjust specific to their element type.
However, many share one or more
instances of two common sub-properties which we’ll cover first: Graphic Properties and
Text Properties.
Graphic Properties
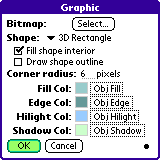
An element’s Graphic
Property controls underlying graphics drawn on the screen based on an
element’s bounding box. Graphics are
normal used to define button boundaries, highlighted areas, or non-interactive
visuals.
Filled/Outline
Rendering
Graphic
Properties can support the following
drawing shapes, and most can drawn either filled, with an outline, or
both.
Check Fill shape interior
to fill the inside of the shape (typically with the selected Fill Color),
and Draw shape outline to draw the exterior of the shape
(typically in the Edge Color).
If neither is selected, no shape will be drawn.
Supported
Graphic Shapes
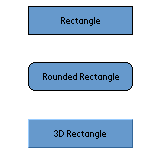
Rectangle
A square plain rectangle.
Rounded Rectangle
A rectangle with corners
rounded at the specified corner radius.
3D Rectangle
A rectangle with beveled edges
in the highlight and shadow colors.
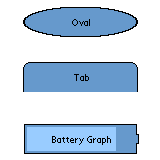
Oval
A circle or oval filling the
element’s bounding box.
Tab (up, down, left, or right)
Half of a rounded rectangle; a
tab shape pointing up, down, left, or right.
Battery Graph (horizontal or vertical)
A filled or hollow image shaped
like a battery with a bar graph inside set to the current battery level. Does not include text.
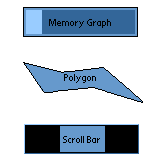
Memory Graph (horizontal or vertical)
A filled or hollow rectangle
filled inside with a memory bar graph showing total used memory. Does not include any text.
Polygon
An arbitrary-shaped closed
polygon of up to 8 vertices.
Scroll Bar (horizontal or vertical)
A scroll bar image showing the
current icon scroll position. Typically
used only on a gadget control set to have a scroll bar action, but may also be
used as a purely visual indicator.
Bitmaps
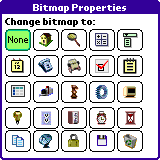
An optional bitmap may also be drawn on top of the graphic
shape (if any) from a selection of handy internal bitmap icons.
Text Properties
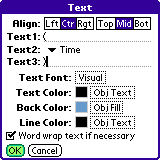
An element’s Text Property
controls how, and which, text is drawn in an element’s bounding box. Text can be a combination of user-defined
characters and system-dependent text such as date, time, HotSync User Name, and
battery voltage.
Text
Options
Text to be drawn can be
vertically or horizontally aligned, and contain two user-defined strings
surrounding system-generated text. The
text can be word-wrapped, if necessary, or alternatively truncated with an
ellipsis if it does not fit within the width of the given bounding rectangle.
Supported
text sources:
Time (long or short)
Category Name
Date (long, medium, or short format)
Day of week (long or short)
Icon page number (e.g 1 or 1/2)
Battery level (percentage)
Battery voltage (current, warning, or critical)
Memory (percent)
Memory (free, used, or total bytes)
HotSync User Name
Device Serial Number
Volume level (system, game, or alarm)
Beam enabled (on/off)
Secret record state (show, hide, mask)
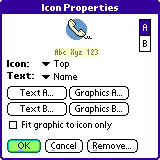
Application Icon Elements
An Icon Element defines
the style and location where a program icon can be placed. Note that it does not specify a specific
file, only the location on screen where a file icon should be drawn and how to
display it graphically.
A and B
Rendering Styles
Icons support two alternate rendering styles. The A rendering style defines how the
icon will look under normal use, while the B style defines how the icon
will look when highlighted by a pen press.
You can tap the A and B preview buttons at the top of the
screen to show how each version will look.
HINT: When an icon is
selected, the B style is drawn on top of the existing display; any
remnants of the A style are not automatically erased. Thus, the selected state really draws as A+B,
so if you don’t want the A style to show through the B style, you
must set up the B graphic property to blank over any parts of the A
style already drawn.
Icon
and Text Choices
The program icon defined in
global Theme Icon settings is normally drawn along with the name of the
program. The placement of the icon
relative to the name can be set (top, bottom, left, or right), as well as
whether the name is also accompanied by the program size.
Graphic
and Text Properties
Separate text and graphic
properties are associated with each of the A and B styles. The graphic property behaves as previously
described and defines an arbitrary shape to be drawn behind the program
icon. The text property, on the other
hand, is slightly modified, in that it controls how the program name is drawn
rather than a selectable text source.
Normally, the graphic property
is drawn to fith the entire Icon Element bounding box.
Choose Fit graphic to
icon only to shrink the graphics to fit only the program icon
itself. Text outside the icon is then
automatically kept out of the icon area.
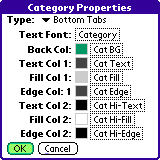
Category Elements
Category
Elements can appear as a traditional
pick list or any number of tab-based variations. Categories can appear in four styles:
Pick Lists
A standard control resembling
the category selector of the default system launcher.
Tabs
The shape of the tabs and text
can face up, down, left, or right. The
tab direction does not dictate where you put the element; you can still size
and place it wherever you wish.
Buttons
Like tabs, except each tab is
drawn as a completely rounded rectangle.
There is currently no difference between up and down facing buttons.
Rectangles
Each tab is drawn as a 3D rectangle
using the Edge1 and Edge2 colors respectively as highlight and
shadow colors.
Gadget Elements
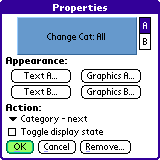
Gadget
Elements define on-screen objects that
respond to a pen tap or 5-way selection.
They can be used to create interactive buttons that navigate, launch
applications, or perform system functions, or to create purely visual display
elements that change information when tapped.
A and B
Rendering Styles
Like Icon Elements, Gadgets
support two alternate rendering styles.
The A rendering style defines how the gadget will look under
normal use, while the B style defines how the gadget will look when
highlighted by a pen press. Selecting Toggle
Display State makes the gadget switch between A and B
each time it is selected.
HINT: When an gadget is
selected, the B style is drawn on top of the existing display; any
remnants of the A style are not automatically erased. Thus, the selected state really draws as A+B,
so if you don’t want the A style to show through the B style, you
must set up the B graphic property to blank over any parts of the A
style already drawn.
Graphic
and Text Properties
Separate text and graphic
properties are associated with each of the A and B styles. The graphic property behaves as previously
described and defines an arbitrary shape to be drawn, while the text property
controls any text that is drawn.
Typically, the text describes the gadget’s function or shows a system
parameter (like beam enable state, for instance) that is modified by the
gadget.
Gadget
Actions
Gadgets can perform one of the
following functions when activated:
Popup apps list / apps in category
Pops up a list of applications.
Selecting an entry launches it immediately.
Popup prefs panel
Pops up a list of system preferences panels. Selecting an entry launches the panel
immediately.
Popup DA lists
Pops up a list of PalmOS desk accessories (DA’s) like TealTools.
Selecting an entry opens the selected accessory.
Popup system clock
Pops up the system clock, if supported by the handheld model.
Popup TealGlance
Pops up the TealGlance reminder window, if installed.
.
Toggle backlight
Toggles the system display backlight, if supported.
Toggle beam enable
Toggles on and off the state of the system beam-receive.
Adjust brightness
Pops up the system display brightness control, if present.
Adjust contrast
Pops up the system display contrast control, if present.
Adjust system/game/alarm volume
Pops up a pick list to adjust the device system, game, or alarm
volume.
Page previous/next
Scrolls application icons to the last or next page.
Page horizontal/vertical scroll
Act as an icon scroll bar.
Typically used only with scroll bar graphic shape.
Category previous/next
Advances or retreats the current category.
Category goto
Goes to a specific category.
The user can hold down the gadget to change the target category,
allowing them to use this function as a “favorite category” button. If the target category is empty, tapping a
gadget mapped to this action will change the current category to “all”. (New in 1.18)
Category list
Pops up a list of all active categories. This action lets any gadget function like a
“pick list” category selector. (New in 1.18)
Show menu
Pops up the TealDesktop’s menus. Tapping unused space at the top of the screen already activates
menus by default, so this is useful only lower on screen.
Show/hide private records
Calls the system security popup to set the current private
record state.
Lock handheld
Locks the handheld using the system security app or TealLock, if
present.
Turn off handheld
Turns off the handheld.
File beam
Beams any single file dragged to it, or opens the File Beam
Screen if tapped.
File send
Sends any single file dragged to it, or opens the File Send
Screen if tapped.
File info
Shows Info on any file dragged to it, or opens the File Info
Screen if tapped.
File delete
Deletes any single file dragged to it, or opens the File
Delete Screen if tapped.
File copy/move
Copies any single file dragged to it, or opens the File Copy
Screen if tapped.
Launch named application
Launches a single specified application. User can also tap and hold the gadget to
change apps.
Launch named prefs panel
Launches a single specified prefs panel. User can also tap and hold the gadget to
change the selected panel.
Launch named DA panel
Launches a single specified desk accessory. User can also tap and hold the gadget to
change the selected panel.
Visual Elements

The simplest of display
components, Visual Elements are not interactive. Instead, they just contain a Graphic
and Text Property, and are used to add visual display elements to
the screen, such as dividing lines, clocks, and graphic flourishes.
Visual elements do not respond
to taps.
Chapter 12 – Theme Editor: Full Screen Modes
All PalmOS devices support a
normal square display mode of 160x160 or 320x320 pixels (160x160 in standard
coordinates). Many new devices also
support special full screen modes with standard coordinate measurements
of either 160x240 (portrait) or 240x160 (landscape).
TealDesktop has the advanced
ability to intelligently reorganize the display to use extra space from these
device-specific full screen modes.
NOTE:
If you are making a
theme for general distribution, it must be full screen friendly.
Automatic size/position adjustment
Under the Element Position
screen, an element can be set to automatically adjust itself from its base
coordinates (at the top of the screen) when it detects the device is in a full
screen mode.
Horizontal
Auto-Adjust
When the display is wider than
normal, the element’s X and W coordinates can be set to automatically adjust
themselves. The element can stay in the
current position (stick left), move with the right edge of the display (stick
right), or keep the center of the element in the same position relative to both
sides of the display (move proportionally).
Vertical
Auto-Adjust
When the display is taller than
normal, the element’s Y and H coordinates can be set to automatically adjust
themselves. The element can stay in the
current position (stick top), move with the bottom edge of the display (stick
bottom), or keep the center of the element in the same position relative to the
top and bottom of the display (move proportionally).
HINT: Create most objects in
standard (not full) display mode first, and then set auto-adjustment options to
set where the full screen position will be.
If you place objects outside the normal display area while in full
screen mode, the expanded coordinates will be incorrectly saved as the element
“base” position.
If you later try to
set auto-adjustment settings for these objects, you may see them zoom off
screen as the already-enlarged coordinates are adjust up to off-screen
values. If this occurs, you can still
select the object using the Element Order screen and manually adjust
coordinates using the Element Position screen.
Hidden objects
Sometimes, you’ll want to
create objects that only appear when the device is in a full screen mode. Typically this is used to place extra Icon
Elements to take advantage of the enlarged display. To do this, simply expand the display and
place these objects in the expanded area.
Turn off all auto-adjustment options, sticking the object to the left
and top sides of the display.

If the new elements are completely off screen, they will
automatically be hidden when the device is in standard display mode.
If part of the element’s
bounding box can still be seen, however, part of the object will appear in the
normal display. To prevent this from
happening, you can check the option: Hide
if outside icon-safe area in the Element Position screen. The icon safe area defaults to
160x160 standard coordinates, but can be made smaller in the Theme Icon
screen.
Coordinate tweaking
One final set of adjustments
can help fine-tune the placement of objects in full screen modes.
In the element position screen,
you can a positive or negative adjustment to every element’s position or size
coordinate that will be applied in case the display is in a full screen
mode. These tweaking values
appear to the right of each coordinate.
These tweaking values are
commonly used to adjust positions of base icons (icons that also appear in
non-full display modes) to get nicely centered columns when in full screen
modes.
NOTE: The X and W tweaking
values are only added when the device is in a wider (landscape) display
mode. Correspondingly, the Y and H
tweaking values are only applied in vertically expanded display modes.
Chapter 13 – Theme Editor: Advanced Hints
PalmOS Simulator
It’s possible to create great
themes on an actual handheld device.
Sometimes, however, it’s more convenient to do so on a desktop PC using
the PalmOS Simulator, available from individual licensee web
sites (www.palmone.com) or from PalmSource directly (www.palmsource.com).
The simulator has a number of
distinct advantages for theme development, including input and navigation via
keyboard and quick access to image databases created by the TealPoint Image
Manager.
Key Shortcuts
The Theme Editor
supports the following shortcuts:
Space - selects the next object in the object list if in
select mode
Backspace - selects the previous object in the
object list
Tab - toggles select/test mode
Home button - toggles select/test mode
Simulator Version
The simulator comes in many
customized versions tailored to emulate specific devices. Most of the time, we use the Tungsten T5
simulator from PalmOne. Despite some
annoyances, it has a number of advantages, including support for both landscape
and portrait full screen modes, which makes it very easy to test these on every
theme.
More importantly, however, it
supports the new PalmOS Non-volatile File System (NVFS), which means that it
saves your data between sessions or crashes, so you won’t automatically lose
your theme if the simulator crashes or your computer unexpectedly restarts.
Extracting Data
While it’s easy to load
programs and data into the Simulator using the Install Database popup
menu (right click to get it), getting your theme back off again is not so
obvious. To do so, just use
TealDesktop’s Copy menu to copy the theme file (choose Show
all files) to the external expansion card.
A Tungsten T5 has an internal expansion card, so the external slot
appears as the second card. The
Simulator emulates the external card slot using a folder named Card1
on your hard drive. Just find this
folder inside the simulator install folder, and you’ll find your copied theme
inside.
“Lost” Elements
If you accidentally scroll an element completely off screen,
otherwise set it to inaccessible coordinates, remember that you can always
select the element using the Element Order Screen. All the other element menus will then work
on the selected element, even if it is not visibly selected on screen, so you
can bring up the Element Position Screen to fix the incorrect
coordinates.
Optimizing for speed
When creating a theme with many background visuals, especially
with those using rounded shapes, try to group virtual objects near the bottom
of the object list so they can be cached during screen drawing. This will greatly speed up screen drawing
during scrolling and other operations.
When using background images, also be sure to match the image format
with the current screen format. By
default, most color devices run in an 8-bit display mode unless you choose the Force
16-bit mode in TealDesktop preferences.
If you try to display a 16-bit image in 8-bit mode, TealDesktop will do
the conversion for you, but there will likely be noticeable pauses when
redrawing the screen. If creating a
background image for distribution, consider releasing different versions of the
image for different display modes.
Chapter 14 – Custom Icon Bitmaps
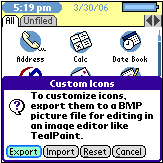
For a truly custom look, it’s
possible to replace the bitmap images built into TealDesktop that are used for
on screen gadgets and controls. To do
this, use the Custom Icon Bitmaps menu to import or export the
image bitmaps that are being used for the current display resolution and color
mode. (New
in 1.18)
Exporting
Choose the Export
option to save the current icon bitmaps into a BMP file. You can choose a destination to save the
image, either to memory or an external storage card. When saved you an external card, you can insert the card into a
PC-based card reader for editing on your PC.
Editing
The exported image file can
also be edited directly on your handheld with TealPaint. Each icon will appear in a 6 x 4 grid of
squares. Simply load the BMP file into an
TealPaint image database, edit the images (without disturbing the grid lines)
and then save it back out again into BMP format.
Importing Icon Bitmaps
Once you have modified the
images in the database, choose the Import button in the Custom
Icon Bitmaps screen to load the modified icons.
Icon Sets
Custom icons are stored in a
file in RAM called “TealDesktop Icons”, where they will override the icons
built into the program. This file can
be traded or copied to other handhelds as an “icon set” for TealDesktop. The icons are resolution (high versus low)
and color-depth (color versus monochrome) specific, so if you beam it to
another handheld, the icons will only look correct if that handheld is running
in the same color depth and resolution.
Appendix A –
TealPoint Image Manager
The TealPoint Image Manager
(IMAGEMGR.EXE) is a Windows utility that converts images to and from TealPaint
image format.
Use
the TealPoint Image Manager to import
or export images to or from TealPaint-format databases, view them on the
desktop, or print them to a Windows printer.
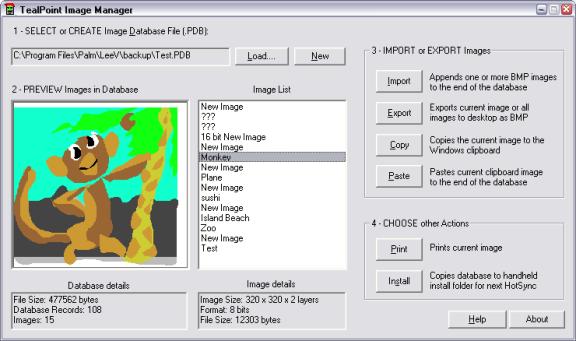
Step 1 – Select a Database File
You can create a new TealPaint-format database, or find the
backup of an existing one created on your handheld. Click on “Load” or load an existing database or “New” to create a
new one.
When
you HotSync your handheld, TealPaint
image databases are automatically backed up to a folder called “BACKUP”
which in turn resides in a folder named after your handheld’s Hotsync User Name in the Palm install folder.
For
instance, if your user name is “John Smith”, the backup folder would be
in another folder named “SmithJ”.
The backed-up files are named the same as the databases on the
PalmPilot, but have a '.PDB' extension, like “PICTURES.PDB.”
NOTE: All
PalmOS database files
have a “.PDB” file extension. If you
find an image database on, say, a website that also has a .PDB extension, it
may not be (and probably is not) in TealPaint format, so don’t be surprised if
the image manager cannot load it.
Step 2 – Preview images
Once a database is loaded, you can view any of the images in
the database. Scroll the Image List to
see the list of images by selection.
Tap on a name to see that image to the left.
Step 3 – Import or Export Images
Importing an Image
Click on “Import” to import images from .BMP format. You can also click “Paste” to import an
image copied to the Windows clipboard from another program or captured using
the PrintScreen button. The Image
Import window will appear, with a preview of how the image will appear.
On
this screen you can set the target bit depth and image size of the final
imported image, and also adjust the brightness and contrast of the converted
image. Two options are also present:
Maintain proportions when scaling
When setting image sizes or fitting the image to a
screen size, this option makes sure the image’s aspect ratio remains
intact. When this option is not set,
you’ll be free to stretch the image vertically or horizontally out of shape.
Dither image pixels
Allows the program to using patterns of similar colors to simulate the presence of intermediate colors. This option can greatly enhance the appearance of photographic images in grayscale or 8-bit modes.
Importing Multiple Images
When selecting a .BMP image to import, you can
actually use the SHIFT button to choose more than one image at a time if they
reside in the same folder, and import them in one step into the TealPaint image
database.
When you do so, the first image selected will appear as normal, but a new “Import All” button will appear in the lower right. Click on it to import all the images together using the same settings, or “Import” to import only the first image and reopen the Import window with the next image selected.
Exporting Images
Click on the “Export” button to export one or more images to
.BMP format, or “Copy” to export the currently selected image to the Windows
clipboard so that it can be pasted into a PC-based paint or other program.
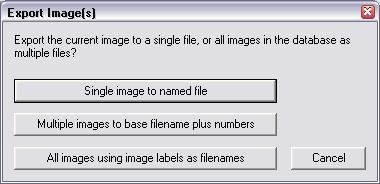
You have three export choices:
Single image to named file
The current image shown in the main window will be
exported to a .BMP file you specify.
Multiple images to base filename plus numbers
All the images in the database will be exported in
order as numbered files. You specify
the base filename, after which three numbers will be added. For instance, if you specify “Fred.bmp”, the
actual files will be named “Fred000.bmp”, “Fred001.bmp”, “Fred002.bmp”, and so
on.
All images using image labels as filenames
All images in the database will be exported using
each image’s name as its filename. The
Image Manager will add the .BMP extension as necessary, and will add “[2]”,
“[3]”, etc to images whose names conflict with existing files or previous
images. You specify a default filename
to be used for files with no description or whose name consists of invalid
Windows filename characters.
Step 4 – Other Actions
Printing an Image
Click on “Print” to print the current image to your Windows
printer.
Install Database
Once changes have been made to a database, you need
to “install” the changes to copy them back to the handheld. This is true even if the file exists in the
user backup folder, as the Palm Desktop will not automatically mirror the
changes back. In fact, it is even more
important to install a database here, as the backup file will get overwritten
if the database is modified on the handheld.
You can use the Palm Install Tool in the Palm Desktop
program to install the databases, or tap on the “Install” button in the Image
Manager to automatically install the current database for you.
NOTE: Never
make changes to the same database (or databases of the same name) on both the
desktop and handheld at the same time.
The entire database is backed up when changes are made on the handheld,
and entire databases (not just individual images) completely overwrite the same
file on the handheld when you install them.
Appendix B – TealPoint File Manager
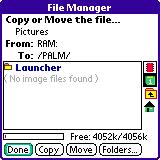
When a “Move” action is available in a TealPoint applications, the
TealPoint standard File Manager provides a consistent interface for copying or
moving files.
Moving/Copying Files
The TealPoint Standard File Manager allows you to copy or move the
pre-selected file from one folder or device to another. The contents of a target location to receive
the file appear in the lower half of the screen. Simply select the destination device and folder using the file
list and device/navigation icons, and tap on the Copy or Move buttons to
start. Files may be copied between RAM
and external storage cards, or between folders on the same storage card. The target location must differ from where
the source file already exists. Note
that items in the list are not selectable, but are present to indicate contents
that may already be present in the target location for the pre-selected file.
Note that operations are limited to what is supported by the
installed hardware and system software.
Palm Memory
PalmOS memory does not support folders, and can normally only hold
PalmOS-specific resource (.PRC) and database (.PDB) files. Desktop-specific files (such as .WAV, .TXT,
etc.) can normally only be stored on external expansion cards, or if copied to
RAM, are typically not recognized by applications.
MemPlug
The system software MemPlug expansion Springboard modules does not
support the VFS-standard interface for moving of files between Cards and RAM,
but third-party add-ons such as the Kopsis Engineering VFS library can add this
capability.
Sony CLIE
Sony CLIE handhelds running older versions of the PalmOS system
software (prior to PalmOS 4.0) do not support copying files to any folders
outside the root standard “MSSONY” folder.
Subfolders can be freely made and used within the MSSONY folder however.
An additional Folder
button is present for creating and deleting folders. If the current target is on a device that supports folders, tap
on it to either delete the current folder location (if it is empty) or create a
new subfolder in the current target location.
Appendix C – TealPoint Pen-Free Navigation
TealPoint Pen-Free Navigation provides access to almost all
programs screens and functions via keyboard or device 5-way rocker pad. Similar to the 5-way interface on the Treo
600, TICL pen-free navigation also adds similar functionality to older PalmOS
handhelds with directional pads or devices with add-on keyboard peripherals.
Pad Navigation
With 5-way controls, a current button, checkbox, or
text field control is highlighted in blue-green or drawn bolded in monochrome
handhelds. The current control is
changed by presses of the directional pad, which moves the selection to a
control in the general direction of the button press. The center “select” button will activate the highlighted control,
pressing buttons, toggling checkboxes, or turn on or off the cursor in a text
entry field.
On some devices, like the Treo600, the direction pad is
mapped in the operating system to move the cursor in an active text field. When this is the case, the direction pad
will move the cursor by default, but will change the active control selection
once the cursor has reached the end of the text field and can move no further
in that direction.
Keyboard Navigation
With an add-on keyboard, arrow keys replace the directional
pad of a 5-way control. To select a
control, the Enter key may be used, except when the text cursor is active in a
multi-line text field. When this is
true, the Enter key will enter a line break into the text field instead.
Accelerator Keys
On screens without text entry fields or other elements that
accept keystroke input, buttons may also support an accelerator key which may
be pressed to simulate a press of the key.
When this is the case, the letter is shown underlined in the button.
Appendix D –
Products
Products Visit us online
for our complete product line, including:
SHORTCIRCUIT ( http://www.tealpoint.com/softshrt.htm )
A new twist on gameplay fused from your all time action puzzle favorite games,
connect falling conduit pieces into explosive loops in this frantic race
against the clock.
SUDOKUADDICT ( http://www.tealpoint.com/softsudo.htm )
Sudoku Addict brings to your handheld the addictive worldwide puzzle craze that
has displaced crossword puzzles in many newspapers in Great Britain and Japan.
TEALAGENT ( http://www.tealpoint.com/softagnt.htm )
Get news, movie times, stock quotes, driving directions, web pages and more
without need for a wireless connection. TealAgent fetches and formats web-based
content for offline viewing.
TEALALIAS ( http://www.tealpoint.com/softalia.htm )
Free up memory and make the most of external expansion cards. Placeholder
'Alias' shortcut files automatically find, load, and launch apps and data from
external SD cards, increasing free main memory.
TEALAUTO ( http://www.tealpoint.com/softauto.htm )
Track and graph automobile mileage, service, and expenses with TealAuto, the
complete log book for your car or any vehicle. Extensive customization options
and unmatched in features and functionality.
TEALBACKUP ( http://www.tealpoint.com/softback.htm )
Backup your valuable data with TealBackup, supporting manual and automatic
backups to SD/MMC/CF cards and Memory Stick, backups through HotSync, and
optional compression and encryption.
TEALDESKTOP ( http://www.tealpoint.com/softdesk.htm )
Launch applications with TealDesktop, the themed replacement for the standard
system launcher screen with tabs, multiple card folders, drag and drop, and
more
TEALDIET ( http://www.tealpoint.com/softdiet.htm )
Shape up your life with TealDiet, the diet, exercise, and personal tracking
application for mobile devices. Lose weight, build more muscle, and live
healthier with TealDiet.
TEALDOC ( http://www.tealpoint.com/softdoc.htm )
Read, edit, and browse documents, Doc files, eBooks and text files with
TealDoc, the enhanced doc reader. Extensive display and customization options;
TealDoc is unmatched in features and usability.
TEALECHO ( http://www.tealpoint.com/softecho.htm )
Improve your Graffiti text input speed and accuracy, seeing what you write with
TealEcho digital "ink". No more writing blind!
TEALGLANCE ( http://www.tealpoint.com/softglnc.htm )
See the time, date, upcoming appointments and todo items at power-up with
TealGlance. The TealGlance pop-up utility and key guard comes up when you power
up, letting you see your day "at a glance."
TEALINFO ( http://www.tealpoint.com/softinfo.htm )
Lookup postal rates, area codes, tip tables, schedules, airports, and info from
hundreds of free TealInfo databases. Create you own mini-apps; a handheld
reference library.
TEALLAUNCH ( http://www.tealpoint.com/softlnch.htm )
Launch applications instantly with the TealLaunch pop-up launcher and
button/stroke-mapping utility. Map applications to button presses and pen
swipes so you can get to your apps quickly.
TEALLOCK ( http://www.tealpoint.com/softlock.htm )
Secure and protect your handheld with TealLock, the automatic locking program
with encryption and card support. TealLock has unmatched features and
customization options for personal or corporate use.
TEALMAGNIFY ( http://www.tealpoint.com/softlens.htm )
Save your eyesight with TealMagnify, an ever-ready magnifying glass that works
with most any program. TealMagnify lets you enlarge the screen for those times
the text is too small to read.
TEALMASTER ( http://www.tealpoint.com/softmstr.htm )
Replace Hackmaster with TealMaster, the supercharged 100%-compatible system
extensions manager. TealMaster adds enhanced stability, configuration and
diagnostic features and PalmOS 5.0 hack emulation.
TEALMEAL ( http://www.tealpoint.com/softmeal.htm )
Save and recall your favorite restaurants with TealMeal, the personal
restaurant database. With TealMeal's handy sorting and selection options, never
ask "where to eat" again.
TEALMEMBRAIN ( http://www.tealpoint.com/softmemb.htm )
Stop crashes and monitor your memory use with TealMemBrain, the application
stack stabilizer. TealMemBrain boosts your stack space on OS3 and OS4
handhelds, eliminating causes of system instability.
TEALMOVER ( http://www.tealpoint.com/softmovr.htm )
Beam, delete, rename, and copy files with TealMover, the file management
utility for SD/CF/MS cards. TealMover lets you see, move, modify, hex edit, and
delete individual files.
TEALMOVIE ( http://www.tealpoint.com/softmovi.htm )
Play and convert high-quality video and synchronized sound with the TealMovie
multimedia system. TealMovie includes a handheld audio/movie player and a
Windows AVI/MPEG/Quicktime converter program.
TEALNOTES ( http://www.tealpoint.com/softnote.htm )
Insert freehand graphics anywhere with TealNotes "sticky notes" for
Palm OS. TealNotes can be inserted into memos, to-do lists, address book
entries--almost anywhere you currently have editable text.
TEALPAINT ( http://www.tealpoint.com/softpnt.htm )
Paint, sketch, or draw with TealPaint, the all-in-one mobile graphics paint
program and photo editor. Highlights include 25 tools, 32 patterns, 49 brushes,
zoom, layers, undo, & JPEG/GIF/BMP support.
TEALPHONE ( http://www.tealpoint.com/softphon.htm )
Supercharge the address book with TealPhone, the contacts replacement with
superior interface and options. Highlights include enhanced display, search,
phone-dialing, groups, and linking.
TEALPRINT (
http://www.tealpoint.com/softprnt.htm )
Print text and graphics to IR, serial, and Windows printers with TealPrint.
With numerous connection options, TealPrint, is the all-in-one text and graphic
printing solution.
TEALSAFE ( http://www.tealpoint.com/softsafe.htm )
Store your passwords, credit cards, PIN numbers, and bank accounts in the
TealSafe data wallet. With maximum security and encryption, TealSafe is a must
for features and security.
TEALSCAN ( http://www.tealpoint.com/softscan.htm )
Keep your PDA or Smartphone healthy, clean, and fast with TealScan, the system
maintenance utility. Use TealScan to fix crashes, find updates, and keep your
device running smoothly and efficiently.
TEALSCRIPT ( http://www.tealpoint.com/softscrp.htm )
TealScript adds Graffiti text input to Treo and Centro smart phones. For
devices that already support Graffiti, TealScript adds a trainable system that
supports both multi-stroke and Graffiti-1.
TEALTRACKER ( http://www.tealpoint.com/softtrac.htm )
Track time and expenses with a fast, easy to use interface that requires
minimal effort. Generate reports and export data to a spreadsheet. TealTracker
is your personal time clock.
TEALTOOLS ( http://www.tealpoint.com/softtool.htm )
Improve productivity with TealTools pop-up Palm Desk Accessories. TealTools
includes a popup calculator, clock/stopwatch, preferences panel, editing panel,
memopad, and a file/backup manager.
Appendix E – Revision History
Version
1.24 - April 7, 2008
·
Added new improved UI with shaded buttons and optional thin
fonts
·
Added 'System fancy fonts' option in preferences to turn
on/off thin fonts
·
Added workaround for bug in TX to re-nable full screen mode
icon in landscape mode after system mistakenly disables it
Version
1.23 – August 7, 2006
·
Added support for mapping application button on Palm Treo
700p to TealDesktop as default launcher
Version
1.21 – June 22, 2006
·
Fixed icon placement in hires devices or display modes
(landscape) that do not support direct screen writes
Version
1.20 - May 30, 2006
·
Added new "Standard Tiny" and "Standard Tools
Tiny" themes (Use "Choose Theme->Create" to create them if
TealDesktop is already installed)
·
Fixed crash launching on Palm Z22 handheld
·
Fixed initial drawing of screen when entering Theme editor
on Palm Z22
Version
1.19 – April 3, 2006
·
Fixed graffiti-seek in “all” category when hidden categories
are present
·
Fixed theme customizations to apply to categories that have
not been visited since the last global category change
Version
1.18 – March 30, 2006
·
Added preference option to specify a startup category other
than 'all'
·
Added preference option to use half-sized fonts for icons on
high-res devices
·
Added menus to import and export customize icon gadget
bitmaps
·
Added auto-positioning of popup category/app lists to match
trigger gadget
·
Added support for category-favorite gadgets (go to a
specific category when tapped)
·
Added support for category-list gadgets (similar to category
pick list)
·
Added support for mapping the hardware launcher button
(really application button #1) on lifedrive/TX to TealDesktop when 'Use as
default launcher' option is on
·
Fixed beam enable/disable controls to work on newer devices
·
Fixed crashes switching to/from landscape mode on some
devices
·
Fixed display from blanking background in lower third of the
screen when minimizing the graffiti area on LifeDrive and possibly other
devices
·
Fixed display of high-resolution images in landscape mode on
devices that do not support direct screen access
·
Fixed dragging and resizing of objects in theme editor
·
Fixed gadget action selection from popping up wrong
selection list for named app/panel actions
·
Fixed pen selection of categories when using 'All at end'
mode
·
Fixed scrambled icons on LifeDrive when accessing card-based
folders (Palm's SD driver trashes files if code tries to do a 0-byte write)
·
Fixed to rescan icons after copying/moving apps with
copy/move menu
Version 1.10
– November 11, 2005
·
Added option to move 'All' category to end of RAM categories
(in RAM Categories -> Order)
·
Fixed selection of date indicator in default 'standard' and
'standard list' themes (delete theme to recreate)
·
Fixed compatibility with Palm Z22
Version
1.05 – August 22, 2005
·
Added backup of icon categories in case system is reset
immediately after a full scan on an NVFS device
·
Added support for auto-launching SD cards (with startup.prc
file)
·
Updated so pressing Treo menu button will dismiss open men
·
Fixed graffiti-seek when in a sub-category
Version
1.00 – March 1, 2005
·
Initial Release
Appendix F – Contact Info
TealDesktop by TealPoint
Software
©2005-2008 All Rights Reserved.
TealPoint Software
TealDesktop for PalmOS
454 Las Gallinas Ave #318
San Rafael, CA 94903-3618
We look forward to hearing from
you.
Please visit us at
www.tealpoint.com, or email us at contact@tealpoint.com.
Appendix G – Registering
Registering allows you to use
the program past the 30 day expiration period and turns off registration
reminders.
Currently, you may register by
snail mail or online with a credit card and a secured server from the store
where you downloaded the software. For
the first option, send the following information on a sheet of paper separate
from your payment.
·
Product Name
·
E-Mail Address
·
HotSync User ID (Pilot Name
Required for Passkey generation. It can be found on the main screen of the
HotSync application on the Pilot as "Welcome ________" or in the
corner on a PalmIII or higher)
·
Check (drawn off a US Bank) or
Money Order for ($19.95 US). No
international checks or money orders please.
Legal Notice
We at TealPoint Software are committed to providing quality,
easy-to-use software. However, this product is provided without warranty and
the user accepts full responsibility for any damages, consequential or
otherwise, resulting from its use.
This archive is freely redistributable, provided it is made
available only in its complete, unmodified form with no additional files and
for noncommercial purposes only. Any other use must have prior written
authorization from TealPoint Software.
Unauthorized commercial use includes, but is not limited to:
§
A product for sale.
§
Accompanying a product for sale.
§
Accompanying a magazine, book or other publication for sale.
§
Distribution with "Media", "Copying" or
other incidental costs.
§
Available for download with access or download fees.
This program may be used on a trial basis for 30 days. The
program will continue to function afterwards. However, if after this time you
wish to continue using it, please register with us for the nominal fee listed
in the program.
CUSTOMER
LICENSE AGREEMENT
YOU ARE ABOUT TO DOWNLOAD,
INSTALL, OPEN OR USE PROPRIETARY SOFTWARE OWNED BY TEALPOINT SOFTWARE, INC.
CAREFULLY READ THE TERMS AND CONDITIONS OF THIS END USER LICENSE BEFORE DOING
SO, AND CLICK BELOW THAT YOU ACCEPT THESE TERMS.
1. License. You are authorized
to use the Software Product owned and developed by TealPoint Software, Inc. on a
single hand-held computing device on a trial basis for thirty (30) days. If
after 30 days you wish to continue using it, you are required to register with
TealPoint and pay the specified fee. This license is not exclusive and may not
be transferred. You may make one copy of the Software for back-up and archival
purposes only.
2. Ownership. You acknowledge
that the Software Product is the exclusive property of TealPoint Software, Inc,
which owns all copyright, trade secret, patent and other proprietary rights in
the Software Product.
3. Restrictions. You may NOT:
(a) decompile or reverse engineer the Software Product; (b) copy (except as
provided in 1 above) sell, distribute or commercially exploit the Software
product; or (c) transfer, assign or sublicense this license.
4. Disclaimer of Warranty and
Liability. TEALPOINT MAKES NO WARRANTY, EXPRESS OR IMPLIED, AS TO THE ACCURACY,
COMPLETENESS OR FUNCTIONING OF THE LICENSED SOFTWARE, INCLUDING WITHOUT
LIMITATION, WARRANTIES OF MERCHANTABILITY OR OF FITNESS FOR A PARTICULAR
PURPOSE, ALL OF WHICH TEALPOINT DISCLAIMS. ALL LIABILITY IS DISCLAIMED AND
TEALPOINT ASSUMES NO RESPONSIBILITY OR LIABILITY FOR LOSS OR DAMAGES OF ANY
KIND, DIRECT OR INDIRECT, INCIDENTIAL, CONSEQUENTIAL OR SPECIAL, ARISING OUT OF
YOUR USE OF THE LICENSED SOFTWARE, EVEN IF ADVISED OF THE POSSIBILITY THEREOF.
5. Termination. You may
terminate this Agreement at any time by destroying your copy(ies) of the
Software Product. The Agreement will also terminate if you do not comply with
any of its terms and conditions, at which time you are required to destroy your
copy(ies) of the Software Product and cease all use.
6. Applicable Law. This
Agreement is governed by the laws of the State of California.
![]()