
TealAuto
User's Manual
Program
Version 2.21
Last
Updated: July 6, 2010
Table of Contents
Introduction
Description
Contents
WebOS Files
PalmOS Files (.ZIP Archive)
Program files:
Document files:
Windows Mobile Files (.EXE Installer)
Windows Desktop PC File (.EXE Program)
Installing the Program
WEBOS
PALMOS
WINDOWS MOBILE
WINDOWS DESKTOP PC
Terms used in this document
Chapter 1 – Overview
TealAuto Versions
Using TealAuto
Fueling Logs
Trip Logs
Service and Expense Logs
Reports and Summaries
Configuration
Meter Minder
Chapter 2 – Fueling
Logs
Fueling Entry List Details
Fueling Entry Screen
Fueling Types
Odometer Reading
Data Fields
Fuel Quantity and Price
Fluids
Notes
Currencies
Chapter 3 – Trip Logs
Trip Entry Screen
Trip Types
Accounts
Notes
Chapter 4 – Service
and Expense Logs
Scheduled Services Screen
Service Summary Screen
Text Service Summary
CSV Service Summary
Calendar Event
Task Entry
Listed Services Screen
Services Entry Screen
Service/Expense Types
Data Items
Notes
Chapter 5 –Reports
and Summaries
Start and End Dates
Summary Reports
Statistics
Transactions
Text Format
CSV Format
Comparison Reports
Vehicle Comparison Reports
· Average
efficiency before fill-up
· Average
efficiency after fill-up
· Average
fuel price
· Total
fuel purchased
· Average
fuel purchased
· Total
fuel cost
· Average
fuel cost
· Average
days between fuel
· Average
dist between fuel
· Average
fuel cost/distance
· Total
distance
· Total
trip distance
· Projected
annual distance
· Total
direct cost
· Average
direct cost
· Total
service/expense cost
· Average
service/expense cost
· Cost
by distance
· Cost
by month
· Adjusted
direct cost
· Adjusted
trip expenses
· Adjusted
trip distance
· Average
distance between service
· Average
days between service
Account Comparison Reports
Payment Type Comparison Reports
Fuel Station Comparison Reports
Service Location Comparison Reports
Fuel Grade Comparison Reports
Fuel Brand Comparison Reports
Report Types
Text
Bar Charts
Pie Charts
Timeline Charts
Chapter 6 – Database
Setup
Vehicles
Odometer Units
Services
More Data
Fuel Stations
Fuel Grade
Fuel Brands
Service Locations
Service and Expenses
Accounts
Payment Types
Chapter 7 – Meter
Minder
Chapter 8 –
Preferences
Alarm Preferences
Currency Preferences
Display Preferences
Numbers Preferences
Cost:
Price:
Volume:
Distance:
Odometer:
Efficiency:
Units Preferences
Volume:
Distance:
Fuel Efficiency:
Auto-Sync Preferences
Chapter 9 – Using
Services
Creating Services
Attaching Services
Scheduling Services
Initial Service
Service Intervals
Scheduled from Last Event
Service Summaries
Chapter 10 – Using
Reports
Fuel Efficiency
Pump Accuracy
Quality of Gas
Fuel Grade Effect on Efficiency
Expense Summaries
Lease Mileage
Chapter 11 – Synchronization
Synchronization Procedure
Sync Targets
Sync Targets
WebOS Handhelds:
PalmOS Handhelds:
Windows Mobile Handhelds
Windows Desktop PC
Sync Modes
Force Sync
Sync Results
Automatic Sync
Chapter 12 –
Exporting Data to a Spreadsheet
Format
Chapter 13 –
Importing Data
Step 1 – Export Sample CSV Template
Step 2 – Add Custom Data
Step 3 - Transfer the Data to the Handheld
Step 4 – Start Import
Step 5 – Select Options
Undoing Changes
Chapter 14 – Purging
old Records
Chapter 15 – Manually
Transferring Data
Appendix A – TealPoint File Dialogs
File Lists
Navigation
Flash Memory
Appendix B –
TealPoint Pen-Free Navigation
Appendix C –
Registering
Appendix D – Contact
Info
Appendix E – Products
Appendix F – Revision
History
Appendix G – Legal Notice
CUSTOMER LICENSE AGREEMENT
Introduction
Description

Thank you for trying TealAuto, the
advanced automobile mileage and expense-tracking program for mobile
devices. TealAuto can be used to record
fill-ups, trip distance, service and expenses for multiple vehicles. The program is highly configurable,
supporting custom services, gas brands, gas grades, service stations and
billing accounts. Unmatched reporting
capabilities also allow exporting and summarizing of information in charts, graphs,
memos, or documents.
Contents
WebOS Files
The WebOS version comes in an ipk file bundle delivered directly from the Palm Catalog to your device. You should normally never see or need to interact with this file.
PalmOS Files (.ZIP Archive)
PalmOS programs are distributed in a compressed ZIP archive
typically named TEALAUTO.ZIP that contains the following files:
Program files:
TEALAUTO.PRC The TealAuto program file
TPSETUP.EXE Easy installer program (Windows only)
Document files:
AUTODOC.PDF This document in Adobe Acrobat (PDF) format
AUTODOC.HTM This document in HTML format (sans images)
AUTODOC.PRC This document in TealDoc format
REGISTER.HTM TealPoint Registration form in HTML format
REGISTER.TXT TealPoint Registration form in text format
Windows Mobile Files (.EXE Installer)
Windows Mobile programs are distributed in an automatic EXE
installer meant to be run on your desktop PC.
TEALAUTO_PPC_INSTALL.EXE The TealAuto Windows Installer
Windows Desktop PC File (.EXE Program)
Windows Desktop PC programs are distributed as a plain EXE file
that you can save to your desktop and run directly.
TEALAUTO.EXE The TealAuto Desktop PC program
Installing the Program
WEBOS
Download and run the program directly from the Palm App Catalog.
PALMOS
From Windows (automatic install)
On a Windows PC you can also use quick setup installer by double
clicking on the TPSETUP.EXE installer program, and following the on
screen prompts.
From All Systems (manual)

Use the Palm Installer in the Palm Desktop to
install the program file TEALAUTO.PRC.
Instructions on how to use the Palm Installer are in the
handbook that came with your Treo, Palm, Pilot, PalmPilot, or WorkPad. You can find the installer either as a
stand-alone program in your Palm install folder, in the Windows Start
Menu with the other Palm programs, or in the Palm Desktop program as an
icon (called Install or Quick Install) along the left-hand side.
Optional Documentation
You can also optionally install a handheld version of this
documentation. This manual is provided in this archive as the PalmPilot
document AUTODOC.PRC. To read it,
install it using the Palm Install Tool and read it with a Palm doc reader
program like TealDoc.
WINDOWS MOBILE
Connect your handheld to your desktop PC, then run TEALAUTO_PPC_INSTALL.EXE
on your PC and follow the on-screen prompts..
WINDOWS DESKTOP PC
No installation is necessary.
Save the TEALAUTO.EXE to a convenient location on your Desktop or other
location. Run it by double-clicking on
it.
If you want Start Menu shortcuts, you can create these manually by
right-clicking on the app and using the Windows Create Shortcut menu.
When the program is first run, the program will create a new
folder in your My Documents directory with the same name as the .EXE
file. This is where the program’s data
files are stored.
Terms used
in this document
Hardware Buttons:
The physical buttons (typically
labeled Date, Address, To Do, and Memo) on the bottom of the handheld.
Scroll Up/Down Buttons or 5-way navigator:
The physical rocker switch or
separate buttons at the bottom center of the handheld.
Graffiti:
The special letter-like symbols
you write to enter text with your stylus.
Graffiti Entry Area:
The rectangular area at the bottom
of the display screen where you can write letters using the graffiti input
language.
Silkscreen Buttons:
The four, printed circular, tap
areas (typically labeled Home, Menu, Calculator, and Find) to the left and
right of the graffiti drawing area.
Menus:
The drop-down menus you get when
tapping on the silkscreen Menu button.
Chapter 1
– Overview
TealAuto is
a convenient and powerful data collection and analysis system, allowing you to
easily enter fueling, service, and trip information while on the road. Powerful summary and analysis tools allow you
to track and graph that information as well, all while still on the move. It even features a handy meter minder
countdown timer with an alarm to keep those pesky parking tickets at a minimum.
TealAuto
Versions
TealAuto
runs as a standard handheld application program on WebOS, PalmOS and Windows
Mobile devices. An optional Windows PC
version is also available.
The
handheld TealAuto versions support facilities for importing and exporting data
to a desktop computer or Windows PC version.
The handheld
programs do not require a desktop component, however, and are designed
to run as standalone applications.
Therefore, they are fully compatible with any PC, Mac, or any type
desktop computer that can install the software to the handheld.
TealAuto Desktop for Windows PC runs
as a stand-alone application. Featuring
an identical interface to the handheld versions of TealAuto, it can optionally
synchronize data with handhelds or other Desktop installations using HotSync
(PalmOS only) or removable flash cards.
(New in 2.0)
Using
TealAuto
![]()
Once
installed, run TealAuto by selecting the “TealAuto” application icon on the
application launcher screen or Start menu.
TealAuto
is easy to use, and consists of six basic interface screens, reachable by six
icons in the upper right corner of each screen. From left to right and top to bottom, the icons correspond
to: Fueling Entries, Trip Entries,
Service and Expense Entries, Reports and Summaries, Configuration, and Meter
Minder.
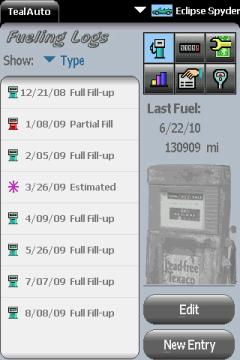
Fueling Logs
![]()
The Fueling Logs screen is used to
log information about gas station stops, and records the date, station,
odometer readings, notes, billing account, and the price, quantity, and grade
of the fuel purchased.
Trip Logs
![]()
The Trip Logs
screen logs trip, accident, and memo reports.
Trip entries contain a date, start and stop odometer reading and allow
assigning the elapsed mileage between up to three billing accounts. Accident and memo reports contain only one
odometer reading, and can be used to store information relating to an event
associated with a particular date or mileage.
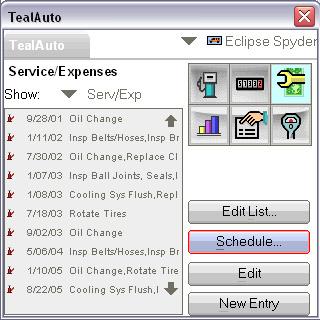
Service and Expense Logs
![]()
Services and
Expenses are logged into this screen, which stores the cost, date, vendor, and
mileage associated with this event.
Services and expenses can be chosen from a configurable list of
entries. Services can also be assigned
a repeating time or mileage interval, so TealAuto can remind you when regular
maintenance is due.
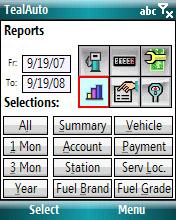
Reports and Summaries
![]()
TealAuto features
unmatched reporting and graphing capabilities, features accessible from the Reports
and Summaries screen. Here, data
can be summarized or exported to external formats including the memos, Doc
files, and comma separated value (CSV) files.
A wealth of analysis tools is available, allowing the break down of data
records into text reports, bar charts, or timeline graphs.
Configuration
![]()
TealAuto is
extremely configurable. In the Configuration
screen, the user can define a virtually unlimited number of vehicles, gas
brands, gas stations, gas grades, payment types, billing accounts and
service/expense types.
Meter Minder
![]()
A simple but
useful feature, the Meter Minder functions as a straightforward countdown
timer with an alarm and multiple retries.
Chapter 2 –
Fueling Logs

The
Fueling Logs screen displays all fueling log entries for the current
vehicle.
Fueling Entry
List Details
Each entry is displayed with the date and selectable detailed info about each entry, such as the type, odometer reading, calculated fuel efficiency (for full fill-ups), gas station, payment method, cost-per-mile, etc.
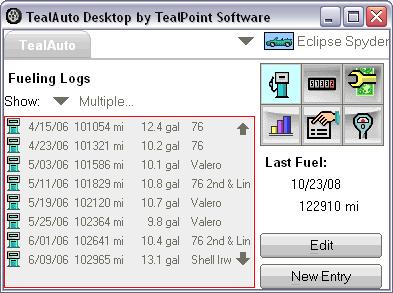
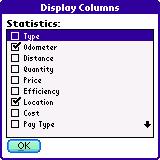
For
use primarily on wide-screen devices or the TealAuto Desktop, select the detail
entry “multiple..”, which lets you display more than one informational item at
once. (New
in 2.06)
Upon choosing “Multiple…”, you’ll be presented with a list of details that can be shown. You can choose as many items as you like, but any data that cannot fit in the list will be cut off.
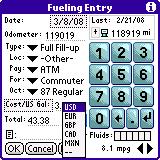
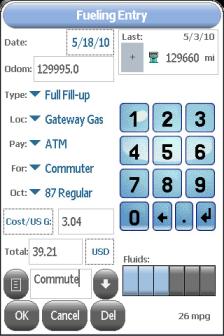
Fueling Entry Screen
Select “Edit” to enter the Fueling Entry screen to see or modify details for an existing entry or “New Entry” to create a new entry from scratch.
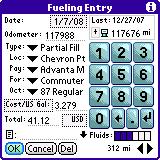
Use
the Fueling Entry screen to enter details for a stop to the gas
station. An on-screen keypad is
available for easy Graffiti-free entry of numerical values. When the “enter” button is pressed on the
keypad, the next empty text field is automatically activated.
Fueling Types
Three fill-up “types” can be selected: Full, Partial, and Estimated. While all three accept the same data, distinguishing between different fueling stops with different types allows for selective report generation (see “Reports and Summaries”). For instance, it’s possible to generate fuel efficiency reports that ignore any results calculated using data from “estimated” fueling log entries. Also, “Partial” fill-ups are added together to calculate mileage values between “Full” fill-ups, so it’s important to mark partial fill-ups as such to avoid anomalous efficiency calculations.
Odometer Reading

The
odometer field is used to calculate distance traveled and efficiency between
full fill-ups.
You can enter the current odometer value directly, or select the ‘Plus” (+) button to enter the value as a change in miles (trip odometer) calculated since the last fill-up.
Data Fields
Through drop down menus, the gas station (location), gas grade (octane), payment type, and billing account can be selected for the fueling stop. These selections come from the user list of available choices defined in the Database Setup screen.
Fuel Quantity and Price
TealAuto supports two methods of entering gas quantities. While the amount purchased can be entered as a quantity (US Gallons, UK Gallons, or litres), it can also be entered as a price. If so, the quantity purchased is calculated automatically when the total fuel cost is entered. The latter method is often preferable, as the fuel price can be entered while gas is being pumped, leaving only one quantity (the total cost) to be entered after pumping is done. Furthermore, entering a price is more accurate, as the amount of fuel shown on the pump is a rounded off value, and using it will result in a price estimate that may vary slightly from the actual price charged.
Fluids
A fluid level can be specified as one to six
filled boxes. This is typically used to
record oil, water, or other fluid levels.
When no boxes are selected, the level is considered undefined. Select a box to set a level. Select it again to clear all boxes. (New in 2.0)
Notes
A freeform note or memo can be associated with each entry. The first line appears on the fueling entry screen. To expand the note to full screen, select the paper-shaped “note” icon.
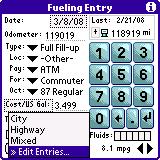
To
easily enter notes from a pre-defined list of entries, select the down-arrow
button next to the note entry field.
This “Quick List” of entries is useful if you need consistent keywords
for accounting or other purposes.
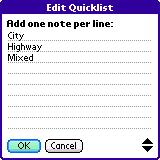
Select
“Edit quick list” to define a list of custom keywords. Enter each word on it’s own line, separated
by a line break.
Currencies
TealAuto supports mixing of multiple currencies, and allows you to specify a different currency for each fueling entry.
In the Currency Preferences menu, you can define up to five currencies and set the exchange rate between them used in generating reports. If no currency is selected, the default currency is assumed. (New in 2.0)
Chapter 3 – Trip
Logs
Select “Show: Multiple…” to show more than one detail at once, space permitting. (New in 2.05)
Trip Entry Screen
Select “Edit” to enter the Trip Entry screen to see or modify details for an existing entry or “New Entry” to create a new entry from scratch.
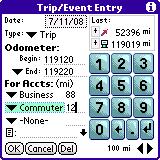
The Trip Entry also features an
on-screen keypad. As on the Fuel
Entry screen, when the “enter” button is pressed on the keypad, the next
empty text field is automatically activated.
Trip Types
Unlike fueling entries, trip entries contain a selectable type which affects which data fields are available. “Trip” entries contain both a start and end odometer reading, and are used to record events associated with traveling a specified distance. The end odometer reading can be specified as an actual final value, or as an elapsed distance (trip miles).
Note: When creating a “Trip” entry, always enter both a beginning and ending odometer reading, as the difference between the two is required to calculate correct trip distances.
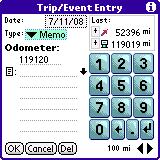
“Accident” and “Memo” entries, however, are used to record notes
and events associated with a single location and time, such as an accident
report or notable sighting.
Accounts
The elapsed mileage for “Trip” events can be divided by up to three separate billing or tracking accounts. This allows for, say, a trip to be easily billed as 50% business and 50% personal without creating two separate trip entries. Enter the miles to assign to the second and/or third account, and the remaining balance will automatically be calculated and assigned to the first account.
Notes
As
with fueling entries, a freeform note or memo can be associated with each
entry. To expand the note to full
screen, select the paper-shaped the “note” icon.
Chapter 4 –
Service and Expense Logs
The
Service and Expense Logs screen displays non-fueling transactions that
have an associated cost. This can include
simple expenses such as parking and tolls, or scheduled maintenance items such
as oil changes and tire rotation.
Select “Show: Multiple…” to show more than one detail at once, space permitting. (New in 2.05)
When scheduled services exist, the date and/or mileage of next scheduled service are shown under the heading “Service Due”.
To view the current scheduled services, select the “Schedule” button to enter the Scheduled Services screen. To add or schedule new services, select “Edit List” button to enter the Listed Services screen.
Scheduled
Services Screen
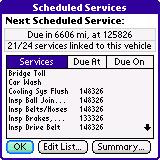
The
Scheduled Services screen shows all services attached to the current
vehicle, along with the next date and/or miles at which the service is
scheduled. Select the Services, Due
At, or Due On pushbuttons to sort the list by that criteria.
Services listed only include those that have been explicitly linked to the current vehicle. To link or unlink services from the global available list, select the “Edit List” button. To save or print a summary of selected services (useful when bringing in a vehicle for service), select the Summary button.
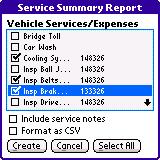
Service Summary
Screen
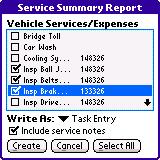
To generate a service summary, check the
services to include and select Create.
Service summaries can take one of the following formats:
· Text
· CSV
· Calendar Event
·
Task Entry
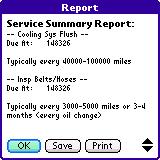
Text Service Summary
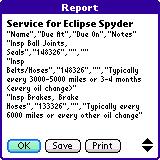
A
text service summary can be printed with TealPrint (PalmOS only) or saved to a
text file, doc, or memo.
CSV Service Summary
A CSV service summary is useful for
exporting the service information to a spreadsheet and can be saved to a text
file or memo.
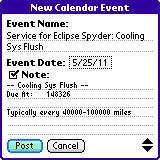
Calendar Event
A calendar event lets you automatically
place a reminder in your PIM calendar for the selected service(s). The default date for the event is determined
either by the date of the first service scheduled by date, or an estimate based
on average mileage and the first service scheduled by miles. (New in 2.0)

Task Entry
A task entry lets you automatically place an
item in your PIM Tasks list for the selected service(s). (New in 2.0)
The
initial due date for the entry is determined either by the date of the first
service scheduled by date, or an estimate based average mileage and the first
service scheduled by miles.
Listed Services
Screen
After services are defined in the Database Setup screen, they must be linked to a specific vehicle before they can be used for that vehicle. This customization process allows them to have periodic service intervals that vary from one vehicle to the next.
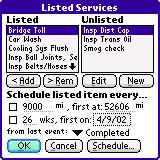
Select the Add or Rem buttons
to link or unlink services from the current vehicle. Select Edit to modify an unlinked service, or New
to create a new service.
Scheduling Service
Once services are linked (“active”), they can be scheduled to issue a reminder after a specified number of weeks and/or miles. Do so by setting the date and/or mileage of the first (next) scheduled and the intervals between future services.
Service Intervals
Service intervals can be specified in two ways: by Completed or by Scheduled date and mileage. When a service is listed by date/mileage scheduled, service reminders continue on a fixed schedule (e.g. 3000, 6000, 9000, etc) regardless of exactly when each service is actually performed.
When scheduled by date/mileage completed, however, the next due date/mileage is calculated from when each service was actually performed. While the former method keeps vehicle due dates on nice, round numbers, the latter method is more economical and more consistent with how routine maintenance is meant to address normal vehicle wear and tear.
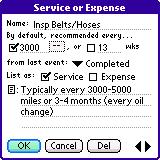
Services Entry
Screen
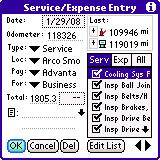
The Services Entry screen is similar
to both the Fuel and Trip Entry screens.
Service/Expense Types
Each log entry can be designated as a Service,
Expense, or Misc type entry.
A scrolling
checklist of
services and expenses presents items to be selected for the transaction. When the type field is changed to service
or expense, the list automatically switches to showing items of that
type. When the misc type is
selected, all items are shown.
Data Items
Standard drop down lists and text entry fields allow for entry of odometer readings, total cost, entry location, payment, and billing account.
Notes
As with fueling entries, a freeform note or
memo can be associated with each entry.
To expand the note to full screen, select the paper-shaped the “note”
icon.
Chapter 5
–Reports and Summaries
The Reports and Summaries screen presents powerful tools to analyze trends and compute statistics from transaction logs entries.
Start and End Dates
When
generating reports, TealAuto scans all transactions found within a range of
dates. Specify dates either by directly
entering them in the Start and End controls, or selecting the All,
1-Month, 3-Month, or Year buttons to automatically set a
convenient range.
TealAuto supports two types of reports: Summary Reports and Breakdown Reports.
Summary Reports
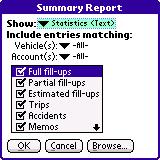
The
first of eight report options, Summary Reports summarize statistics
calculated from transactions in the specified date range.
Reports can be generated from all entries, or limited only to transactions linked a selected vehicle, account, or type.
Four types of summary reports are available:
· Statistics (Text)
· Statistics (CSV)
· Transactions (Text)
· Transactions
(CSV)
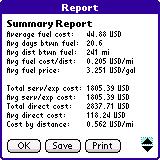
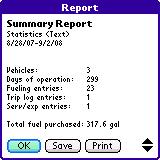
Statistics

Statistics
summaries show a list of useful averages and totals for transactions in the
requested date range:
STATISTICS
Vehicles: 3
Days of operation: 299
Fueling entries: 23
Trip log entries: 1
Serv/exp entries: 1
Total fuel purchased: 317.6
gal
Avg fuel purchased: 13.8
gal
Avg fuel efficiency: 19.4
mpg
Total trip distance: 100
mi
Total distance: 5048
mi
Proj annual dist: 6162
mi
Total fuel cost: 1032.32
USD
Average fuel cost: 44.88
USD
Avg days between fuel: 20.6
Avg dist between fuel: 241
mi
Avg fuel cost/dist: 0.205
USD/mi
Avg fuel price: 3.251
USD/gal
Total serv/exp cost: 1805.39
USD
Avg serv/exp cost: 1805.39
USD
Total direct cost: 2837.71
USD
Avg direct cost: 118.24
USD
Cost by distance: 0.562
USD/mi
Cost per month: 284.72
USD
Adj direct cost: 1390.48
USD
Adj trip expenses: 21.00
USD
Adj trip distance: 100
mi
Avg dist between service: 8380 mi
Vehicles
Number of vehicles represented in the calculated stats (New in 2.0)
Days of operation
Days between first and last transactions in date range
Fueling entries
Number of applicable fueling entries in date range
Trip log entries
Number of applicable trip entries in date range
Serv/exp entries
Number of applicable service and expense entries in date range
Total fuel purchased
Amount of gasoline purchased (in user-specified default units)
Average fuel purchased
Average amount of gasoline purchased per fueling transaction (in gallons or liters)
Average fuel efficiency
Average fuel efficiency in time period (in user-specified default units). This statistic is most useful when the summary report is limited to a single vehicle.
Total trip distance
Total distance assigned to trip log entries in date range (in miles or km)
Total distance
Total distance traveled (in miles or km)
Projected annual distance
Projected annual mileage based on date range (in miles or km per year)

Total
fuel cost
Total cost of fuel purchased in default currency units. If multiple currencies were used, the total represents an estimate based on the exchange rates entered in the TealAuto Currency Preferences screen.
Average fuel cost
Average cost of fuel per transaction in default currency. This statistic is most useful when the summary report is limited to a single vehicle. (New in 2.0)
Average days between fuelings
Average number of days that elapsed between fuelings for the same vehicle. (New in 2.0)
Average distance between fuelings
Total elapsed distance traveled between fuelings for the same vehicle.
(New in 2.0)
Average fuel cost per distance
Average of ratio of fuel cost at each transaction
divided by the number of miles or km traveled since the last filling.
Average fuel price
Average price of fuel per transaction (in default quantity and currency units)
(New in 2.0)
Total service and expense cost
Total spent on service and expense entries (in default currency)
Average service and expense cost
Average spent on each service and expense transaction (in default currency)
Total direct cost
Total logged service, expense, and fuel costs in the date range (in default currency).
Average direct cost
Average logged service, expense, and fuel costs in the date range per transaction (in default currency). (New in 2.0)
Cost by distance
Total direct cost divided by the total miles traveled (in default currency/distance units)
Cost per month
Projected total cost of operation per month based on logged direct costs (in default currency/month)
Adjusted direct cost
Total fuel and service expenses, adjusted by the direct rate of the account associated with each transaction. Typically, the direct rate set to the percentage of a direct cost that is either tax-deductible or employer-reimbursed for each account. When this is done, the Adjusted direct cost statistic is a convenient way to summarize the deductible or reimbursed expenses for a time range.
Adjusted trip expenses
Total trip miles assigned to accounts, multiplied by the mileage adjustment rate set for each account. Like Adjusted direct cost, the Adjusted trip expense can be used to summarize deductible or reimbursed travel, but does so on a per-mile (or per-km) basis.
Adjusted trip distance
Total
distance (miles or km) assigned to accounts and used for the Adjusted trip
expenses calculation.
Average distance between service
Average distance between service/expense entries (in default distance units) (New in 2.0)
Average days between service
Average days between service/expense entries (in default distance units) (New in 2.0)
Transactions
Transactions summaries show not only statistics but raw data from each entry. They are especially useful for exporting data for spreadsheets and other programs:
Vehicle: Mazda
Miata
Date: 2/8/08
Type: Full Fill-up
End Odom: 118626 mi
Distance: 309 mi
Cost: 37.24 USD
Cost/Dist: 0.12 USD/mi
Fuel Price: 2.999 USD/G
Efficiency: 24.9 mpg
Quantity: 12.4 gal
Account1: Commuter
Fuel Grade: 87 Regular
Location: Arco San Marin
Pay Type: ATM
Text Format
Text
format reports display information in a readable format. They can be saved or printed in TealPrint is
installed (PalmOS only).

Select the Save button to save a generated report. Choose from the following options:
· File
· Memo
·
Doc
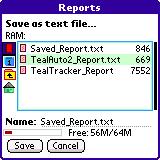
File
Exports the report into a plain text file that can be read with a word processor or text editor.
Memo
Exports the report to one or more Memo Pad memos (PalmOS only). As memos are limited to a maximum size, TealAuto creates new memos as needed to fit all the text in the report. As text in memos can be selected and copied from the Palm Desktop software, exporting to the Memo Pad can be a handy way to export data to the desktop.
Doc
Standard Palm Doc files are a simple text file format supported by most PalmOS document readers like TealDoc. This option creates a new uncompressed document with a name of your choosing. If you have a desktop conduit installed as part of a PalmOS word processor that supports Doc format, this can be an alternate way to import data to the desktop. Note that Palm Doc format is not compatible with Microsoft Word “.doc” format files.
HINT: Please refer to the Appendix on using the TICL Standard File Dialog to navigate folders and devices when loading and saving files.
CSV Format

In
comma-separated-value (CSV) files, data fields are separated by commas and
quotation marks. Use the CSV format to export
transactions or statistics data into table that you can easily import into
Excel or another spreadsheet.
HINT:
See the “Exporting Data” section of this document for more
information on using CSV files to export data to a spreadsheet program.
Comparison
Reports

Comparison
reports are designed to track how a statistic changes between a single
variable. For instance, you can use
comparison reports to show how fuel efficiency (the statistic) compares between
vehicles (the variable).
Reports can be very useful in analyzing the
data you’ve collected. See Advanced Reports for more tips
and information on using them effectively.
The following variables are supported:
· Vehicle
· Account
· Payment Type
· Fuel Station
· Service Location
· Fuel Brand
· Fuel Grade
Additional controls let you specify which transactions are included in the report, such as limiting the statistics to a particular vehicle, account, or type of transaction.
Each variable supports a different set of applicable statistics and additional controls:
Vehicle Comparison Reports
Compares the following statistics on a vehicle-by-vehicle basis:

·
Average efficiency before fill-up
·
Average efficiency after fill-up
·
Average fuel price
·
Total fuel purchased
·
Average fuel purchased
·
Total fuel cost
·
Average fuel cost
·
Average days between fuel
·
Average dist between fuel
·
Average fuel cost/distance
·
Total distance
·
Total trip distance
·
Projected annual distance
·
Total direct cost
·
Average direct cost
·
Total service/expense cost
·
Average service/expense cost
·
Cost by distance
·
Cost by month
·
Adjusted direct cost
·
Adjusted trip expenses
·
Adjusted trip distance
·
Average distance between service
·
Average days between service
Account Comparison Reports
Compares the following statistics on a
account-by-account basis: 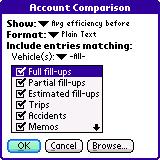
· Average efficiency before fill-up
· Average efficiency after fill-up
· Average fuel price
· Total fuel purchased
· Average fuel purchased
· Total fuel cost
· Average fuel cost
· Total trip distance
· Total direct cost
· Average direct cost
· Total service/expense cost
· Average service/expense cost
· Adjusted direct cost
· Adjusted trip expenses
· Adjusted trip distance
Payment Type Comparison Reports
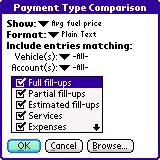
Compares
the following statistics on a payment-by-payment basis:
· Average fuel price
· Total fuel purchased
· Average fuel purchased
· Total fuel cost
· Average fuel cost
· Total direct cost
· Average direct cost
· Total service/expense cost
· Average service/expense cost
· Adjusted direct cost
Fuel Station Comparison Reports

Compares the following statistics on a station-by-station basis:
· Average efficiency before fill-up
· Average efficiency after fill-up
· Average fuel price
· Total fuel purchased
· Average fuel purchased
· Total fuel cost
· Average fuel cost
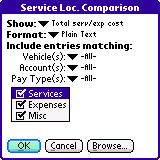
Service Location Comparison Reports
Compares the following statistics on a location-by-location basis:
· Total service/expense cost
· Average service/expense cost
· Adjusted direct cost
Fuel Grade Comparison Reports
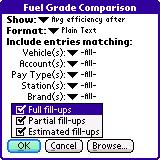
Compares the following statistics on a grade-by-grade basis:
· Average efficiency after fill-up
· Average fuel price
· Total fuel purchased
· Average fuel purchased
· Total fuel cost
· Average fuel cost
Fuel Brand Comparison Reports
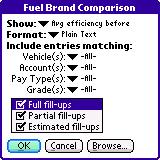
Compares the following statistics on a brand-by-brand basis:
· Average efficiency before fill-up
· Average efficiency after fill-up
· Average fuel price
· Total fuel purchased
· Average fuel purchased
· Total fuel cost
· Average fuel cost
Report Types
Comparison reports can be displayed in text format as well as graphic bar, pie, and timeline charts for easy judging of trends.
Text
Text reports summarize results in a simple list format. The number of transactions found in each variable quantity is shown in parentheses.
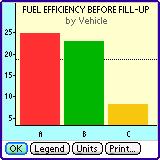
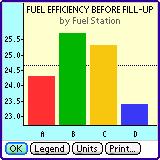
Bar Charts
Bar Charts show the same calculated statistics summarized in a text report, but displays them as a simple bar chart with one bar for each variable item. The bars are identified with a single letter, corresponding to an off-screen legend, reachable by selecting the Legend button.
A dotted line in the chart shows the average
of all values.
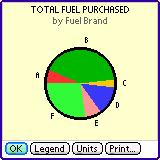
Pie Charts
Pie Charts show statistics relative to their
combined total, letting you easily see the percentage each variable
occupies. (New
in 2.0)
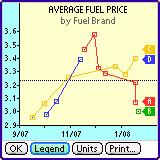
Timeline Charts
Timeline Charts show statistics as they change over time. When displaying averages, the actual data points used in the calculations are shown. When displaying totals, the chart shows total as it builds over time.
Chapter 6 –
Database Setup
On
the Database Setup screen, you can create and edit vehicles, gas
stations, accounts, and other entries that appear as selections when creating
fuel, trip, and service log transactions.
Vehicles
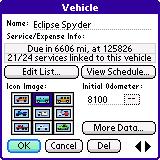
On the Vehicle screen, you can
enter an initial odometer value that is used to calculate service due dates and
fuel efficiency for the first fueling entry.
You can also specify the odometer units.
Odometer Units
Odometer units are typically specified as either miles or kilometers. A special additional selection—hours—is also available. Using this selection, TealAuto can be used to track usage and maintenance of generators and other stationary equipment that are equipped with an hourly usage meter. When using hours, distance-based statistics and efficiency units are replaced with time-based ones.
HINT: When generating reports, don’t include time-based equipment and distance-based vehicles together. If you do, the aggregate stats like Average Efficiency or Total Distance won’t make any sense.
Services
Also present are two buttons used to view currently due services. Select Edit List to attach services to the vehicle, View Schedule to see a list of all linked services and when they are next due.
HINT: Services must be attached
to a vehicle before they can be used.
See the “Using Services” chapter for more info on editing and using
scheduled services.
More Data
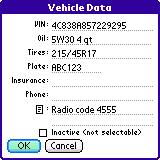
Select the More Data button to enter more information about
your vehicle, including VIN number, license plate, tire size, oil type and/or
quantity, insurance, phone, and a general- purpose note field. (New in 2.0)
Select Inactive to hide the vehicle
from selection in the main vehicle log screen pick lists. Use this to hide historical data for
vehicles that may no longer be in use. (New in 2.10)
Fuel Stations
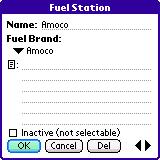
Fuel
stations support a general-purpose note field, typically used to store the
station’s location, address, or phone number.
In addition, it can also be linked to a gas brand if the station is a
member of a chain.
Select Inactive to hide the station from selection in the fuel log screen pick list. Use this to hide stations that are longer frequented. (New in 2.10)
Fuel Grade
Fuel Grades are typically used to track the type of gas used in a fueling, such as “regular”, “premium”, “plus”, or “supreme”, or the octane rating for fuel.
Fuel Brands
Fuel Brands support a note field and typically track the company, chain, or brand name associated with the gasoline.
Service Locations
Service Locations include garages and
service stations which perform automobile maintenance, or parking structures
and lots that charge itemized expenses.
Service and Expenses

Services
and expenses are items that can be charged to a vehicle. Entries can be designated to appear in the
service entry screen’s list of “services”, “expenses”, or both. If neither is checked, the item will only
appear in the “all” list.
Items can be scheduled for recurring service by mileage and/or date. Furthermore, the time/mileage interval specified here can set to restart either whenever the service was last performed (“Completed”), or repeat with a regular interval (“Scheduled”) irrespective of when the actual date it was last performed.
NOTE: Values set on this screen are
only used as initial settings when a service is first linked to a vehicle. Once added, the service intervals can be
adjusted for each vehicle.
Accounts
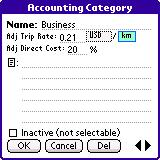
Account
entries are generally used to track the billable purpose of expenses or trip
mileage. Accounts can be used to file
expenses into broad categories (such as “business”, “personal”, “commuter”), or
to assign expenses and travel to specific clients or customers.
Select Inactive to hide the account from selection in log screen pick lists. Use this to hide account that are longer in use. (New in 2.10)
Account entries support two rate fields used in summary reports:
Adjusted
Trip Rate
The Adjusted Trip Rate defines a cost-per-mile conversion factor for any trip mileage assigned to the account. This conversion factor is used to calculate total Adjusted Trip Expenses in comparison and summary reports, and supports a choice of currency and distance units.
Adjusted
Direct Cost
The Adjusted Direct Cost specifies a percentage to be applied to actual fuel and service costs. This percentage is used for calculating the Adjusted Direct Cost in comparison and summary reports, and is often used to summarize tax-deductible costs or company reimbursement.
Payment Types
Payment types are typically used to track how an expense was paid for, be it cash, check, credit card, or more specific selections, such as a particular checking account or card.
Chapter 7 – Meter
Minder
The
meter minder provides a handy countdown timer to warn when your parking meter
is about to expire. The alarm can be
set to sound 1-10 minutes before the timer expires, or to retry a specified
number of times through settings in the program settings screen.
In a handy note area labeled Location,
you can record your parking area, floor, space number. (New in 2.10)
Select a plus (+) button to add time to the meter, or (-) to subtract time from it. Select the Start/Stop button to begin the countdown.
When
the alarm sounds, you have the option of dismissing it or setting it on
temporary snooze. The Snooze interval
can be adjusted in TealAuto Preferences, described in the next chapter.
Chapter 8 –
Preferences
Open the Preferences Screen
from the corresponding drop-down menu.
This screen presents buttons for these preference sub-screens:
·
Alarms
·
Currency
·
Display
·
Numbers
·
Auto
Sync
·
Units
Alarm Preferences

T
On the Alarm Preferences screen, you can set the timing of
service and Meter Minder alerts.
Service warnings pop up whenever you launch TealAuto, and can be based
on time and/or mileage. The Meter
Minder, on the other hand, will up an alarm even when another program is
running. It can be programmed to ring
several times if snoozed or not acknowledged.
NOTE: In order for meter minder
alarms to sound outside of TealAuto, the program must be installed in RAM, as
PalmOS does not process alarms notifications for card-based apps. For Windows and Windows Mobile, the
application must be left running in the background.
Currency Preferences
Use the Currency Preferences screen to specify currencies and
exchange rates used in TealAuto transaction entries and reports. (New in 2.0)
For each currency, specify a name, abbreviation, symbol, and exchange
rate. The exchange rate is used to
generate totals in reports when multiple currencies are involved.
Exchange Rate
As exchange rates constantly change, its useful to enter updated
exchange rates before generating reports if transactions with multiple
currencies are included.
In the Rate column, enter '1.00' on any line. This is your base currency. On all other lines, enter how much of those
currencies can be bought with one base currency unit. Thus, a value of “1.00” next to “Dollars (US)” and a value of
“0.505” next to “Pounds (UK)” specify that 1.00 dollars is equal in value to
0.505 pounds.
Display Preferences
The Display Preferences screen lets you adjust the following
options: (New in 2.0)
Fancy system fonts (PalmOS)
Sets whether new “thin” fonts are used for TealAuto display
screens. Set “All” to use thin fonts
universally, “None” to revert to standard PalmOS fonts, or “Auto” to use
standard fonts for buttons only.
Font size (Windows and Windows Mobile)
Specifies the size of fonts used throughout the program as smaller,
normal, larger, or huge.
On phones with small (low resolution) displays, you may not be able to
select larger fonts and still have everything fit properly.
Click Sounds (Windows and Windows Mobile)
Enables an audible “click” sound when selecting buttons or navigating
within the program.
Vehicle Selector
Sets whether the vehicle selection control in the upper right corner of
the fuel, trip, and service screens contains the vehicle name, icon, or both.
Numbers Preferences
The Numbers Preferences screen lets you specify the number
of decimal points used when displaying various quantities.
Decimals
When statistics and entered quantities are displayed, you can set the
number of digits to show to the right of the decimal point:
Cost:
Cost of fuel, services, and expenses
Price:
Price of fuel and
cost-per-mile statistics
Volume:
Quantity of fuel.
Distance:
Calculated distance totals in reports and statistics
Odometer:
Odometer readings, as entered by user (New in
2.0)
Efficiency:
Calculated fuel efficiency.
Units Preferences
The Units Preferences screen lets you specify the default
measurement units used for log entries and reports.
In TealAuto, you can specify different measurement units for every vehicle or
fueling entry. This flexibility is
especially useful when owning vehicles with different odometer units (km or
miles) or when traveling between countries that sell fuel in different
quantities (gallons vs. litres). (New in 2.0)
Default Units
Whenever no units are explicitly specified, the default units chosen
here are used instead. This is
especially applicable to older entries imported from a TealAuto 1.0 database,
as these will not specify any units.
Default units are also used for statistics shown in reports or elsewhere
in the program, except for odometer readings, which are always displayed as
entered in the units chosen in the vehicle’s Database Setup screen.
The following default units may be set:
Volume:
·
Gallons
(US)
·
Gallons
(UK)
·
Litres
Distance:
·
miles
·
kilometers
Fuel Efficiency:
·
miles
per gallon (US)
·
miles
per gallon (UK)
·
litres/100
km
·
km/litre
·
km per
gallon (US) (New
in 2.10)
·
km per
gallon (UK) (New
in 2.10)
Auto-Sync Preferences

The Auto-Sync Preferences screen lets you specify if a
synchronization operation is automatically performed upon program startup or
exit.
See the chapter on Synchronization for more information on using
this feature.
Chapter 9 – Using
Services
In order to use TealAuto to track services and issue reminder when they
are due, they must first be:
1)
Created
in the global services list (In the Database Setup screen)
2)
Attached
to each vehicle to which they apply (In the Listed Services screen)
3)
Scheduled
to appear with a distance/time interval for that vehicle (In the Listed
Services screen)
Once done, TealAuto will check for services due every time the program
is run, and bring up a reminder if any are required.
Creating Services
Add a service in the Database Setup screen under Services. Here, you can set the default interval for
the service, and also whether the service bases the next service on when the
last one was performed (“Completed”), or on regular intervals from the very
first scheduled service (“Scheduled”).
Attaching Services

Attach services to a vehicle on the Listed Services
screen, accessible from either the Vehicle Database Setup or Scheduled
Services screens.
Scheduling Services

When TealAuto is first run, it creates a default list of commonly needed
services set to typical services intervals.
When you create new services, you also set a default interval for the
new service. Services and service
intervals vary from vehicle to vehicle, however, so you should adjust these
entries according to you vehicle maintenance manual.
Initial Service
When adding a new service to a vehicle in TealAuto, the date and/or
mileage of the first scheduled service should be set to when the next
service is due. With a new vehicle
before its first oil change, this is typically the same as the service
interval. For instance, if tire
rotations are required every 6000 miles, then the first tire rotation is
usually done at 6000 miles. Some
vehicles require a special service after the initial break-in period, however,
so some adjustment may be necessary for the first service interval.
Service Intervals
Maintenance manuals typically break down service into minimum regular
intervals; corresponding to the most frequently needed service--oil
changes--which are needed every 3000-7500 miles, depending on the vehicle and
severity of use. Other services, such
as tire rotation, wheel alignment, and coolant service, occur at less frequent
regular intervals, such as every 2, 3, 4, or more oil changes.
Scheduled from Last Event
Events can be scheduled from either the last event completed or
scheduled, depending on preference. The
“Completed” option schedules services from the last time it was performed,
while the “Scheduled” option schedules it based on the first scheduled
occurrence. For instance, if you have
an oil change scheduled at every 3000 miles, and you log one at 12150 miles,
you can choose to have the next one automatically scheduled at 15150 miles
(“Completed”) or at 15000 miles (“Scheduled”).
Service Summaries
Sometimes it’s useful to generate a list of past or upcoming services
for bookkeeping purposes or to take to a service station. To generate one, select Summary from the
Scheduled Services screen. You’ll be allowed to select which services to
include, as well as the output format of the summary.

The report will include when the selected services were last performed,
and when they are next due.
When generated, you can optionally print out the report (if TealPrint is
installed) or export the report to a text file for easy exporting to a PC via
an external storage card.
Chapter 10 – Using
Reports
Tracking expenses and mileage would be of little use without reporting
tools. TealAuto’s report generation
tools are unmatched, and can be used to generate a wide range of reports and
summaries. Here are some common useful
reports you can generate:
Fuel Efficiency
Fuel efficiency is the most common
statistic compiled from the logs.
Tracking fuel efficiency gives a good snapshot of the health of a
vehicle, as an unexpected drop in efficiency can warn of low tire pressure, improper
tuning, aggressive driving style, or required service. Fuel efficiency can be tracked either as a
calculated item in a summary report, or as a graph or chart when plotted by
vehicle, fuel, or station. It tracking
fuel efficiency, note that one can easily omit the use of estimated or partial
fill-ups by un-checking them from the list of acceptable transactions prior to
generating the report.
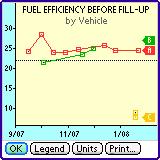
Pump Accuracy
Ever wonder if that gas station down
the street really gives you all the gas you’ve paid for? By charting fuel efficiency as a function of
fuel station, you can feed your paranoia and check for sure.
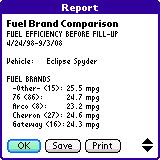
Track the statistic fuel efficiency before fueling when evaluating the pumps, and limit the
reports to one vehicle and one particular grade of fuel for consistent
values. A station that yields
consistently low efficiency numbers may be charging you for more fuel than
you’ve gotten.
Before jumping to any conclusions, however, take into account that some
variance can occur between gas stations if you tend to go to them under
different circumstances. For instance,
a gas station located along a long stretch of highway is likely to report
better mileage due to increased highway driving when compared to one located
along a route for short errands within city limits.
Quality of Gas
Gas brands sometimes generate strong loyalty from their customers. Is this justified from a fuel efficiency
point of view? By tracking the
fuel efficiency after fueling,
you can check when gas from a particular brand or station really gives you
better gas mileage. When tracking as a
function of gas station, it might also let you know if a station is really
giving you that Premium gas you’ve paid for, or if grades of fuel really affect
efficiency at all.
Fuel Grade Effect
on Efficiency
Most manufacturers recommend you use gasoline with an octane recommended
in your owner’s manual and no higher.
Nevertheless, many of us sometimes like to “treat” our cars with a nice
dose of the expensive stuff from time to time.
While we can’t really track whether our vehicle particularly enjoys this
little treat, we can track the mileage as a function of gas grade to see how
many more miles we get per gallon when we use the “good” stuff.
Expense Summaries

Use expense summaries to total
expenditures for a specified date range.
Reports can be limited by vehicle or account, or only include specified
transaction types. In summary reports,
totals are reported both as raw numbers and as values modified by each
account’s “Adjusted” rates.
To summarize the results for all accounts at once, use the “Account”
report button to generate a comparison report of total expenditures as a
function of account.
Lease Mileage
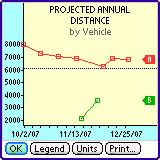
Of particular interest to many
people who lease their vehicles is the number of annual miles they put on their
cars. This is because most leases
charge fees for excessive miles beyond a typical cap of 12000 miles per year.
Both summary and vehicle comparison reports can calculate the projected
annual mileage for a vehicle based on the usage to date. To calculate the projected mileage, set the
report start date to the beginning of the lease year.
When creating a timeline of the annual mileage, the plot will show the
estimated mileage as it is calculated using all the accumulated data so far from
the start date. Thus, the “projected”
miles for the beginning of the term will vary more in the beginning, but will
settle to a more stable value as more data points are added to reach a stable
value, telling you if you need to decreasing your driving to meet your annual
limit.
Chapter 11 – Synchronization
TealAuto supports a handy
synchronization mechanism that allows you to synchronize databases between any
devices running copies of TealAuto. (New in 2.00)
Unlike
traditional synching mechanisms, TealAuto uses a shared storage media to carry
data between devices. While it might
take an extra step or two, it allows synchronization between arbitrary devices
(such as between PalmOS and Windows Mobile handhelds) and allows manual
confirmation when conflicting changes are detected.
Synchronization
is typically done using either a removable storage card or HotSync. The latter is only applicable when synching
a PalmOS handheld to the TealAuto Desktop.
HINT: Whenever
you run a sync operation, the current databases are first backed up, so you can
undo any changes with an “Undo” operation if necessary.
Synchronization Procedure
When
you “sync” a device, TealAuto copies any changes that have been made to the
common storage media. At the same time,
the program loads any changes that have previously been synced there.
Thus,
to copy changes from one device to another, you MUST sync twice, once on the
“source” device and then once on the “target” device. If changes were made on both devices, simply
run one more sync on the “source” device.
For
example, to sync using an SD storage card:

1)
Insert
the card into the first device
2)
Run a
sync to the card
3)
Insert
the card into the second device
4)
Run a
sync to the card
To
sync the PalmOS version with TealAuto Desktop using HotSync
1)
Run a
sync on the handheld with Sync to set to “TealAuto Desktop”
2)
Perform
a HotSync
3)
Run a
sync in TealAuto Desktop with Sync to set to the named handheld HotSync
ID.
Sync Targets
The
following choices are available when choosing a storage media to sync to:
WebOS Handhelds:
One choice, USB Storage Volume, is available. When you sync here, your data is copied to a folder named CARDSYNC on the USB drive. After synching locally, if you then plug your device into a PC and enable USB Drive mode, you can then run synchronize on the TealAuto Desktop and select your USB Drive as a synchronization target.
PalmOS Handhelds:
The
first choice, TealAuto Desktop, will synchronize data to/from the Palm
Desktop backup folders. A list of
system storage volumes will also be displayed.
The last of these usually indicates a removable storage (SD) card, if
one is inserted. Other volumes may be
shown as well, but these typically represent internal flash memory and aren’t
suitable for synching because they aren’t removable.
Windows Mobile Handhelds
One
choice, Storage Card, is available
Windows Desktop PC
If
the Palm Desktop is installed, a named HotSync ID entry will be present
for every installed handheld. Entries
will also appear for any removable flash (SD) cards current mounted as a drive
under Windows.
HINT: TealAuto recognizes any drive as being
“sync-able” by its contents. If the
drive contains a folder named “DCIM”, “PALM”, or “CARDSYNC” in its root folder,
it will appear as a sync-able target.
A
final choice, Windows Desktop, will write data to a folder named
CARDSYNC that it creates on the Windows Desktop. This last choice is really only useful for debugging and manually
manipulating synchronization files.
Sync Modes
When synchronizing, TealAuto can
usually auto-detect which changes to keep and which to reject based on past
snapshots of the databases on both devices.
In a few ambiguous cases, notably when synching for the first time or
when new config entries are available, TealAuto will give you a chance to
accept or reject potential changes. You
can alternatively set the sync mode to Accept All or Reject All
to automate a response.
Force Sync
By
default, TealAuto will only sync individual files if other changes have been
made to the card since the last sync.
Choose this option to force a sync operation regardless of external
changes.
You
can use this feature to force a load all the databases uploaded by another
device. To do so, simply delete the
current databases by using the Import menu to “import” an EmptyDB. Then sync with the “Force Sync” option and
“Accept all changes” sync mode.
Sync Results
The
following operations may be performed during a sync operation:
Records Added:
Number of new History Log or SetupDB entries added to
current databases
Removed Records:
Number of History Log or SetupDB entries that have
been either deleted or replaced by newly added entries
Records Updated:
Number of existing SetupDB entries that have been
replaced with differing versions.
Automatic Sync
To help automate keeping two devices in sync, you can schedule automatic
syncing in the Auto Sync Prefs screen.
This option is most useful for synchronizing a PalmOS handheld with the
TealAuto Desktop.
To setup automatic syncing, select the following two options on both
devices:
·
Load
changes on startup
·
Save
changes before exit
The first option runs a full sync whenever TealAuto is run, while the
second option simply copies any changes made in the current session to the
shared media.
Chapter 12 –
Exporting Data to a Spreadsheet
Data logs from TealAuto can be exported to spreadsheets and other
desktop programs using the summary report generation tool. To do so, generate a summary report in the
Transaction (CSV) format. You may optionally
choose to export only certain transaction types.
Format

CSV (comma separated value) files
are simple text files supported by most desktop database and spreadsheet
applications. In CSV files, data in
cells in output column by column and row by row, with the data for each cell
separated by commas and a line break between rows. Data for each cell is typically enclosed in quotation marks,
which is required if a cell contains a comma character inside. Quotation marks in a cell are denoted by two
quotation marks (“”) next to each other.
TealAuto exports transaction data in 28 columns, in the following order,
preceded by a single line containing the column headers:
1.
Vehicle Name of the vehicle to
associate with the record
2.
Date Date of entry matching
format set in Palm Preferences
3.
Type Type of entry
4.
Beg
Odom Primary mileage
for this entry (trip entries only)
5.
End
Odom Ending mileage
for this entry
6.
Odom
Units The units used for
the odometer (km or mi)
7.
Distance Distance traveled in trip
or since last fueling
8.
Distance
1 Trip distance to
associate with Billing Account 1
9.
Distance
2 Trip distance to
associate with Billing Account 2
10.
Distance
3 Trip distance to
associate with Billing Account 3
11.
Dist
Units The units used
for the distance (km or mi)
12.
Cost Fuel or service
cost
13.
Cost/Dist Fuel cost divided by
distance since last full fuel
14.
Fuel
Price Fuel price
15.
Currency Currency used in cost
16.
Efficiency Fuel efficiency for travel
before fill-up
17.
Eff
Units Fuel
efficiency units
18.
Quantity Fuel quantity entered
19.
Quant
Units Fuel quantity
units
20.
Fluid
Level Fluid level (0-6
characters long)
21.
Account1 Billing account (e.g.
“Client1”, “Commute”, etc)
22.
Account2
Billing account (e.g.
“Client1”, “Commute”, etc)
23.
Account3 Billing account (e.g.
“Client1”, “Commute”, etc)
24.
Fuel
Grade Fuel grade (e.g.
“Super”, “Premium”, etc)
25.
Location Fuel or service station
(e.g. “Shell”, “Bob’s fix-it garage”)
26.
Pay
Type Payment Type
(e.g. “credit card”, “cash”, etc)
27.
Serv/Exp List of services/expenses
done separated by (|) char
28.
Note Note
As not all fields apply to all types of log entries; cells are left
blank if they do not apply to a particular transaction type.
Step 1. Create the report
Generate a report, chosing “Transactions (CSV)” as your output format.
Step 2. Save the report
Method 1: SD Card
Select
Save to save the report to a File.
If you are running the TealAuto Desktop, you can save the file anywhere
convenient and skip to step 3.
Alternatively, if you are running on a handheld device and have a PC-based card reader, save the report to a file on the card.
You can then skip to step 3 and open
up the card on the PC and directly load it into a spreadsheet.
Method 2: Memo (PalmOS Only):
If a storage card and card reader is not available, select Memo to save the report to one or more Memos in the standard Memo application.
HotSync your handheld to copy the memo to the Palm Desktop. You Desktop memos conduit should be set to “Handheld overrides desktop” or “Synchronize the files”
In the Palm Desktop, the exported data should now appear as one or more
memos.
To create the final CSV file, start with a new blank document in a text
editor such as NotePad or WordPad, and use copy and paste to move over the data
from the memo.
NOTE: If the report is large, it
might split across several memos and you’ll need to paste them back together
into a single file.
If the memo has as title line (one
without quotes) DO NOT INCLUDE this title, as it is not part of the CSV
data. Then save the document with a
.TXT or .CSV file extension (such as CARDATA.CSV) and you should then have a
file that can be imported into most any spreadsheet application.
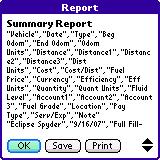
Example:
Below is a simple example of a short CSV file. Your completed file should look similar, but
with more fields. Note that the label
line is actually a single very long line even if it appears word-wrapped in a
text editor. Multiple sequential commas
indicate blank data fields.
"Vehicle","Date","Type","Beg
miles","End miles”
"Eclipse
Spyder","10/21/98","Service",,"15200"
"Eclipse
Spyder","10/28/98","Full Fill-up",,"15419"
"Eclipse
Spyder","11/4/98","Full Fill-up",,"15704"
Step 3. Import into spreadsheet program
If you’ve done this correctly, you should be able to open the CSV text file into a spreadsheet program, with
each value appearing in its own cell.
When importing, set your “text delimiter” to a quotation mark, and the
“record delimiter” to a comma, if requested.

Chapter 13 –
Importing Data
Using TealAuto’s powerful import system, you can load data either
entered externally in a spreadsheet or exported from another program. This chapter describes how to create,
transfer, and import data into TealAuto using the import tools.
Step 1 – Export
Sample CSV Template
TealAuto accepts data imported from a text file or memo in CSV text
format. The import system is flexible,
allowing for different column orders, missing columns, optional headers, and
tab-separated files in addition to comma-separated ones.
However, for best results, we recommend creating some sample records in
TealAuto and following the instructions in the previous chapter to transfer
them to your spreadsheet program. Use
this as an example on how to format the data cells of your actual data:
Step 2 – Add
Custom Data
The first row will contain standard column header names. Keep this row, as TealAuto automatically
detects the contents of each data column if standard header names are present.
In the other rows, replace the sample data with the actual records you
want to import, placing them into the proper corresponding columns. Make sure your table starts in the
top-leftmost cell with no blank rows above or blank columns to the left.
While most columns are optional, you must define both a
“date” and a “type” column, and they must contain valid contents for all data
rows. Contents of the “type” column
should be set to one of the 9 standard log type names:
·
Full Fill-up
·
Partial Fill
·
Estimated
·
Trip
·
Accident
·
Memo
·
Service
·
Expense
·
Misc
For ease of importing from third party programs, the keywords “Fuel”
(Full Fill-up), “Oil” (Service), and “Tire” (Service), are also accepted.
When done, save the file in either a tab-delimited text file format or comma-separated-value
(CSV) file.
Step 3 - Transfer
the Data to the Handheld
Method1: Card Reader
The easiest way to get data to the handheld is via an external SD
card. If you have a PC-based card
reader, simply copy the saved text/CSV file to the card and insert the card in
the handheld.
Method2: HotSync Install (PalmOS)
Alternatively, you can use the Palm Desktop application on the PC to
install the file to the SD card. Be
sure to choose the external card as a destination. This method may not work if you have a handheld spreadsheet or
word processing application installed, however, as that application may try to
convert the CSV file to its own format.
Method3: Memo (PalmOS)
The final method for transferring the file is to transfer it via one or
more memos. To do so, first open the
CSV file into a text editor so it can be seen as text. To do this, open a text editor like
NotePad. Choose the Open menu
and load in the CSV file. You may need
to change the file types control to show “All files” to see your CSV
file. Then select all text and choose Copy
from the Edit menu.
Now enter the Palm Desktop and go to the Memo screen. Choose Paste from the Edit
menu to create a new memo with the contents of the CSV file. If the CSV is large it will be split across
multiple memos.
Step 4 – Start
Import
To begin the import process, start
TealAuto and select Import Records from the Tools menu. You’ll be
presented with the following options:
·
CSV
Text File
·
CSV
Memo
·
Empty
DB
·
Sample
DB
·
TealAuto
1.0 DB
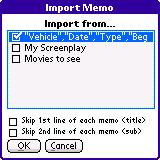
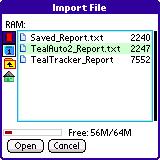
CSV Text Files

If the memo data was split across
multiple memos, a title line may have been added to the top of each memo that
is not part of the CSV data. If this
happens, be sure to check the option: Skip 1st line of each memo.
If the CSV file was saved to a raw text file on an SD card, choose the CSV
Text File option and select the file from the file navigation dialog that
opens.
CSV Memos
If importing from one or more memos, select the memo option, and highlight
the memo or memos containing the CSV data to import.
Empty DB
Use this option to erase all current data. This is useful when preparing to load data from another device
via synchronization.
Default DB
This deletes all current data and replaces it with a default vehicle and
sample SetupDB entries.
TealAuto1.0 DB
This automatically imports data from any TealAuto 1.0 databases
currently installed. The original
databases are not modified.
Step 5 – Select
Options
Once a source file or memo is selected, set the following options to
insure that the data is properly imported.
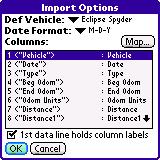
Default Vehicle
Defines which vehicle to assign to new entries when no
vehicle is defined.
Date Format
Sets the month-day-year order of dates contained in the
imported data. Any non-numeric symbols
such as spaces, periods, slashes, or dashes can be used as separators.
Column Mappings
Use this list and the Map button to select the contents of each
column. Sample data from the first data
line of the CSV is presented, along with potential choices for each
column. If the first line contains text
labels, they will be shown as the sample data.
If the labels match standard label names, TealAuto should preset the
mappings to their proper values.
1st line holds column labels
Check this item if the first row of data contains labels and does not
hold actual record data.
Undoing Changes
TealAuto backs up the configuration and log entries before starting an
import operation. To restore the
previous settings after an unsuccessful import, select the Undo Import/Purge
menu item from the Tools menu.
Chapter 14 –
Purging old Records
When
old records are no longer needed, they can be deleted using the “Purge Records”
item under the Program menu.
Records are backed up before deleting, so you can restore purged records from the backup if you make a mistake by immediately selecting the “Undo Import/Purge” menu item.
When deleting a vehicle’s older records,
TealAuto updates the vehicle’s initial mileage and the initial service schedule
for all linked services. (New in 2.0)
Chapter 15 –
Manually Transferring Data
All
2.x versions of TealAuto purposely use the same data file format on all
available platforms (Windows Desktop, Windows Mobile, PalmOS, and WebOS).
This allows you to easy transfer or copy your data between devices, which can be handy when upgrading devices or manually synchronizing data.
Data Files
TealAuto 2.x stores your data records in the following two files:
TealAuto2_Config.PDB
TealAuto2_History.PDB
TealAuto 1.x stores your data records in the following two files:
TealAuto_Config.PDB
TealAuto_History.PDB
Copying Data
To copy your data, simply locate the two data files listed above in your old device and copy them over any versions found on your new device. Make sure TealAuto is not running on either device, and be sure to back up any files before overwriting them just in case. On Windows Mobile devices, be sure to manually quit the app with the “Exit” menu and not just the “X” close button, which only minimizes the app and does not close it.
If you are copying 1.x files over to a new device running a 2.x copy of TealAuto, you’ll need to then use the Import Menu to convert the data from 1.x to 2.x format.
Data Locations
PalmOS
For PalmOS devices, if you’ve been running HotSync with the system backup conduit enabled, you can find backup copies of these two files in your Palm Desktop backup folder, typically at:
c:\program
files\palm\<username>\backup
Note that this folder only contains a copy of your data, so you cannot install files to your handheld simply by copying them here. If you want to install or overwrite new files to the handheld, use the Palm Desktop [Quick] Installer instead.
WebOS
The WebOS version of TealAuto stores its data on the USB drive in the folder:
/TealPointAppData/TealAuto/
You can see these files directly by plugging in your handheld to a computer and enabling USB Drive mode.
Windows Mobile
The Windows Mobile version of TealAuto stores its data in a folder named
\Application
Data\tealauto_ppc\
To access it, sync with ActiveSync and use the “explore” button in the ActiveSync window.
Windows Desktop
The TealAuto Desktop program Windows stores its data in a subfolder of My Documents. The subfolder is named after the program file itself, so if you’ve saved the program as TealAuto.EXE, the folder will be named TealAuto.
Appendix A – TealPoint File Dialogs
File Lists
TealPoint
standard File Dialogs are standard elements in new TealPoint
applications. They provide a crucial
building block missing from PalmOS, that of a consistent, standard interface
for navigating device and folders and selecting individual files.
File dialogs display relevant files
in a particular storage device, folder, and category, along with optional icons
and typically additional information, such as the file size in kilobytes.
Navigation
Use the up and down scroll buttons
to page through the list of items, and tap on a file to select or activate
it. Typing a letter or writing it with
Graffiti will seek the list to the next entry starting with that letter.
The Standard File Dialog also
supports navigation via device-specific controls, including:
5-way
Control Rocker
Use the select button to highlight
the top file in the list. Once an entry
is highlighted, the scroll buttons can move the current selection up and
down. A second press of the select
button will activate (open) the selected file or folder.
Clie
Jog Dial
An inward press of the jog dial selects a file entry, while scrolling the jog
dial up and down changes the highlighted entry. The jog back button, if
present, moves up one folder in the directory structure if the current location
is within a sub-folder. In the root of
a device, or on a device, like RAM, which does not support folders, the back button acts normally, returning to
the application launcher screen.
Accessory
Keyboards
On a PC simulator or add-on
accessory keyboard, the up, down, left,
and right arrow keys function as Palm 5-way control buttons, while the enter key acts as select. The backspace key
navigates to the parent folder.
Flash Memory
Internal
Flash
A dot indicator appears to the left
of a file’s name to indicate any files that are installed in ROM or
PalmOS-formatted flash memory such as a Visor Flash module or unused operating
system flash memory. Files in these
internal locations are generally read-only and cannot be modified or moved into
categories.
External
Flash
External VFS (Virtual File System)
flash card storage devices, such as Memory Stick, Compact Flash or SD/MMC cards
are supported by the TealPoint File Dialogs if appropriate to the application.

When
a VFS-compatible card is detected, an extra row of icons will appear along the
left of the File Dialog for navigating to folders on the external device. On the left are the device icons, used to
select the current card or location to list files. The first icon is the memory icon, and is followed by a numbered
card icon for every expansion card found.
Most devices will support at most
one external storage card, however many devices also support internal virtual
“card” volumes and so will have multiple card icons. Typically, the highest card icon corresponds to the external
card.
To show the files on an external
card, simply select the corresponding card icon. External file devices support a hierarchical folder system, which
are fully supported to help organize files.
If sub-folders are present in the
current folder, simply select them to move “down” into the sub-folder to see
its contents. Below the device icons
are two folder navigation icons. Use
the first parent icon to move up one level to the folder that contains
the current folder. Select the
bottom-most root or home icon to
move all the way back up to the topmost folder.
Appendix
B – TealPoint Pen-Free Navigation
TealPoint Pen-Free Navigation
provides access to almost all programs screens and functions via keyboard or
device 5-way rocker pad. Similar to the
5-way interface on the Treo 600, TICL pen-free navigation also adds similar
functionality to older PalmOS handhelds with directional pads or devices with
add-on keyboard peripherals.
Pad
Navigation
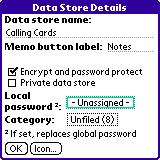
With 5-way controls, a current
button, checkbox, or text field control is highlighted in blue-green or drawn
bolded in monochrome handhelds. The
current control is changed by presses of the directional pad, which moves the
selection to a control in the general direction of the button press. The center “select” button will activate the
highlighted control, pressing buttons, toggling checkboxes, or turn on or off
the cursor in a text entry field.
On some devices, like the Treo600,
the direction pad is mapped in the operating system to move the cursor in an
active text field. When this is the
case, the direction pad will move the cursor by default, but will change the
active control selection once the cursor has reached the end of the text field
and can move no further in that direction.
Keyboard
Navigation
With an add-on keyboard, arrow keys
replace the directional pad of a 5-way control. To select a control, the Enter key may be used, except when the
text cursor is active in a multi-line text field. When this is true, the Enter key will enter a line break into the
text field instead.
Accelerator
Keys
On screens without text entry fields
or other elements which accept keystroke input, buttons may also support an
accelerator key which may be pressed to simulate a press of the key. When this is the case, the letter is shown
underlined in the button.
Appendix C – Registering
Registering
allows you to use the program past the 30-day expiration period and turns off
registration reminders.
Currently,
you may register by snail mail or online with a credit card and a secured
server from the store where you downloaded the software. For the first option, send the following
information on a sheet of paper separate from your payment.
·
Product
Name
·
E-Mail
Address
·
HotSync
User ID (Pilot Name Required for Passkey generation. It can be found on the
main screen of the HotSync application on the Pilot as "Welcome
________" or in the corner on a PalmIII or higher)
·
Check
(drawn off a US Bank) or Money Order for ($19.95 US). No international checks or money orders please.
Appendix D –
Contact Info
TealAuto
by TealPoint Software
©2002-2010 All Rights Reserved.
TealPoint
Software
454
Las Gallinas Ave #318
San
Rafael, CA 94903-3618
We
look forward to hearing from you.
Please
visit us at www.tealpoint.com, or email us at support@tealpoint.com.
Appendix E –
Products
Products Visit us
online for our complete product line, including:
SHORTCIRCUIT ( http://www.tealpoint.com/softshrt.htm )
A new twist on gameplay fused from your all time action puzzle favorite games,
connect falling conduit pieces into explosive loops in this frantic race
against the clock.
SUDOKUADDICT ( http://www.tealpoint.com/softsudo.htm )
Sudoku Addict brings to your handheld the addictive worldwide puzzle craze that
has displaced crossword puzzles in many newspapers in Great Britain and Japan.
TEALAGENT ( http://www.tealpoint.com/softagnt.htm )
Get news, movie times, stock quotes, driving directions, web pages and more
without need for a wireless connection. TealAgent fetches and formats web-based
content for offline viewing.
TEALALIAS ( http://www.tealpoint.com/softalia.htm )
Free up memory and make the most of external expansion cards. Placeholder 'Alias'
shortcut files automatically find, load, and launch apps and data from external
SD cards, increasing free main memory.
TEALAUTO ( http://www.tealpoint.com/softauto.htm )
Save fuel and track automobile mileage, service, and expenses with TealAuto, the
complete log book for your car or any vehicle. Extensive customization options
and unmatched in features and functionality.
TEALBACKUP ( http://www.tealpoint.com/softback.htm )
Backup your valuable data with TealBackup, supporting manual and automatic backups
to SD/MMC/CF cards and Memory Stick, backups through HotSync, and optional
compression and encryption.
TEALDESKTOP ( http://www.tealpoint.com/softdesk.htm )
Launch applications with TealDesktop, the themed replacement for the standard
system launcher screen with tabs, multiple card folders, drag and drop, and
more
TEALDIET ( http://www.tealpoint.com/softdiet.htm )
Shape up your life with TealDiet, the diet, exercise, and personal tracking
application for mobile devices. Lose weight, build more muscle, and live
healthier with TealDiet.
TEALDOC ( http://www.tealpoint.com/softdoc.htm )
Read, edit, and browse documents, Doc files, eBooks and text files with
TealDoc, the enhanced doc reader. Extensive display and customization options;
TealDoc is unmatched in features and usability.
TEALECHO ( http://www.tealpoint.com/softecho.htm )
Improve your Graffiti text input speed and accuracy, seeing what you write with
TealEcho digital "ink". No more writing blind!
TEALGLANCE ( http://www.tealpoint.com/softglnc.htm )
See the time, date, upcoming appointments and todo items at power-up with
TealGlance. The TealGlance pop-up utility and key guard comes up when you power
up, letting you see your day "at a glance."
TEALINFO ( http://www.tealpoint.com/softinfo.htm )
Lookup postal rates, area codes, tip tables, schedules, airports, and info from
hundreds of free TealInfo databases. Create you own mini-apps; a handheld
reference library.
TEALLAUNCH ( http://www.tealpoint.com/softlnch.htm )
Launch applications instantly with the TealLaunch pop-up launcher and
button/stroke-mapping utility. Map applications to button presses and pen
swipes so you can get to your apps quickly.
TEALLOCK ( http://www.tealpoint.com/softlock.htm )
Secure and protect your handheld with TealLock, the automatic locking program
with encryption and card support. TealLock has unmatched features and
customization options for personal or corporate use.
TEALMAGNIFY ( http://www.tealpoint.com/softlens.htm )
Save your eyesight with TealMagnify, an ever-ready magnifying glass that works
with most any program. TealMagnify lets you enlarge the screen for those times
the text is too small to read.
TEALMASTER ( http://www.tealpoint.com/softmstr.htm )
Replace Hackmaster with TealMaster, the supercharged 100%-compatible system
extensions manager. TealMaster adds enhanced stability, configuration and
diagnostic features and PalmOS 5.0 hack emulation.
TEALMEAL ( http://www.tealpoint.com/softmeal.htm )
Save and recall your favorite restaurants with TealMeal, the personal
restaurant database. With TealMeal's handy sorting and selection options, never
ask "where to eat" again.
TEALMEMBRAIN ( http://www.tealpoint.com/softmemb.htm )
Stop crashes and monitor your memory use with TealMemBrain, the application
stack stabilizer. TealMemBrain boosts your stack space on OS3 and OS4
handhelds, eliminating causes of system instability.
TEALMOVER ( http://www.tealpoint.com/softmovr.htm )
Beam, delete, rename, and copy files with TealMover, the file management
utility for SD/CF/MS cards. TealMover lets you see, move, modify, hex edit, and
delete individual files.
TEALMOVIE ( http://www.tealpoint.com/softmovi.htm )
Play and convert high-quality video and synchronized sound with the TealMovie
multimedia system. TealMovie includes a handheld audio/movie player and a
Windows AVI/MPEG/Quicktime converter program.
TEALNOTES ( http://www.tealpoint.com/softnote.htm )
Insert freehand graphics anywhere with TealNotes "sticky notes" for
Palm OS. TealNotes can be inserted into memos, to-do lists, address book
entries--almost anywhere you currently have editable text.
TEALPAINT ( http://www.tealpoint.com/softpnt.htm )
Paint, sketch, or draw with TealPaint, the all-in-one mobile graphics paint
program and photo editor. Highlights include 25 tools, 32 patterns, 49 brushes,
zoom, layers, undo, & JPEG/GIF/BMP support.
TEALPHONE ( http://www.tealpoint.com/softphon.htm )
Supercharge the address book with TealPhone, the contacts replacement with
superior interface and options. Highlights include enhanced display, search,
phone-dialing, groups, and linking.
TEALPRINT (
http://www.tealpoint.com/softprnt.htm )
Print text and graphics to IR, serial, and Windows printers with TealPrint.
With numerous connection options, TealPrint, is the all-in-one text and graphic
printing solution.
TEALSAFE ( http://www.tealpoint.com/softsafe.htm )
Store your passwords, credit cards, PIN numbers, and bank accounts in the
TealSafe data wallet. With maximum security and encryption, TealSafe is a must
for features and security.
TEALSCAN ( http://www.tealpoint.com/softscan.htm )
Keep your PDA or Smartphone healthy, clean, and fast with TealScan, the system
maintenance utility. Use TealScan to fix crashes, find updates, and keep your
device running smoothly and efficiently.
TEALSCRIPT ( http://www.tealpoint.com/softscrp.htm )
TealScript adds Graffiti text input to Treo and Centro smart phones. For
devices that already support Graffiti, TealScript adds a trainable system that
supports both multi-stroke and Graffiti-1.
TEALTRACKER ( http://www.tealpoint.com/softtrac.htm )
Track time and expenses with a fast, easy to use interface that requires
minimal effort. Generate reports and export data to a spreadsheet. TealTracker
is your personal time clock.
TEALTOOLS ( http://www.tealpoint.com/softtool.htm )
Improve productivity with TealTools pop-up Palm Desk Accessories. TealTools
includes a popup calculator, clock/stopwatch, preferences panel, editing panel,
memopad, and a file/backup manager.
Appendix F
– Revision History
Version
2.21 – July 6, 2010
·
Fixed synchronization to work when Device ID contains
unusual characters
·
Fixed saving of notes for existing entries
·
WebOS - new version for this platform
·
Windows Mobile - fixed to save settings when app is
minimized
·
Windows Desktop - updated to better detect and use windows
system colors
·
Windows Desktop - improved text layout to better support
large font settings
Version
2.17 – July 17, 2009
·
Fixed exported tasks showing up with blank subject on
Tungsten E2
·
Added .vcs export in TealAuto Desktop if compatible app
registered to import .vcs file type
Version
2.15 – June 30, 2009
·
Fixed listed services screen to properly import initial
mileage intervals without modifying originals
·
Fixed listed services screen to save changes before editing
service entry
Version
2.14 – June 7, 2009
·
Fixed efficiency calculations to skip initial fuel entry
since previous tank fullness unknown
Version
2.13 – May 7, 2009
·
Fixed crash opening services screen on device with European
(comma separated) number prefs
Version
2.12 – May 1, 2009
·
Improved button sizes in key locations to be more
"finger friendly" in full screen portrait mode
Version
2.12.00 - May 1, 2009 (Windows and Windows Mobile)
·
Added option to manually specify arbitrary font scaling
value (50-200%), display space permitting
·
Added workaround for video display bug in HTC video drivers
when closing windows
·
Improved button sizes in key locations to be more
"finger friendly" in full screen portrait mode
·
Improved drawing speed by caching small sized font
·
Improved display update speed
·
Fixed date selectors to default to numeric format if system
set to non-numeric
·
Fixed support for running on devices running Windows Mobile
2003
·
Fixed detection and opening of empty card-based folders
Version
2.10 - December 26, 2008
·
Added ability to hide inactive vehicles, locations, and
accounts from selection lists (in Database Setup)
·
Added note field to meter time screen used to record parking
location, floor, or space number
·
Added support for Km/G efficiency units
·
Fixed crash navigating file directory with filename longer
than 80 characters (Windows Desktop)
·
Fixed synchronization from leaving duplicates of changed
records
·
Improved synchronization messages to be more descriptive of
actions performed
Version
2.06 - November 25, 2008
·
Added new option to show multiple details on fueling, trip,
and service screens (for wide screens)
·
Improved loading speed of log list to load much faster
·
Improved log list 5-way functionality to scroll before item
is selected
·
Improved log screen layout on wide screen devices, keeping
min column width even with small display fonts
·
Fixed Scheduled Services screen to allow pen-free scrolling
of services list
·
Fixed responsiveness of double-clicks on log list entries in
TealAuto Desktop for Windows PC
Version
2.04 - November 10, 2008
·
Improved import routines to resolve duplicate field
columns
·
Improved import routines to calculate missing fuel quantity,
cost, and price values
Version
2.02 – November 6, 2008
·
Added support for European number format using commas
instead of periods (PalmOS)
·
Added support for delete key in text edit fields (WindowsPC)
·
Added ‘Create All’ and ‘Ignore All’ buttons to import
confirmation window
·
Fixed log entries to correctly sort multiple entries on same
day by odometer
·
Fixed random crashes when importing data from CSV files
Version
2.01 – November 2, 2008
·
Fixed crash displaying history detail list
Version
2.00 – October 21, 2008
·
Fully rewritten from ground up under TICL multi-platform
codebase
·
Added new Windows Mobile version
·
Added new Windows Desktop PC version
·
Added support for full screen modes
·
Added support for mixing multiple user-defined currencies
·
Added support for mixing multiple measurement units
·
Added support for optional fractional odometer values
(tenths)
·
Added support for “hours” odometer units for stationary
equipment
·
Added support for synchronizing with other handhelds and
TealAuto Desktop
·
Added new UI interface
·
Added support for new fonts
·
Added new graphing statistics
·
Added new fluid level entry for fueling logs
·
Added new statistics
·
Added new pie charts
·
Added new vehicle memo fields
·
Added optonal vehicle icons
·
Added service summary export to Calendar event
·
Added service summary export to Tasks entry
Version
1.75 – August 21, 2007
·
Fixed last-service date in service summary reports to show
correct date
·
Updated memo reports to directly support new-palm databases
to work around memorymgr crash bug in Palm Datamanager patch
Version
1.74 - June 24, 2006
·
Fixed crash generating summary reports due to compiler
optimization bug
Version
1.73 - June 13, 2006
·
Added date and odometer of last time each service was performed
in service summary report
·
Added button to enter fueling odometer value as difference
(trip odometer value) from last fueling
·
Added "quick list" pick-list to fueling, trip, and
service logs to select and insert note entries from a user-definable list
·
Added dotted line showing average value in bar and timeline
graphs
·
Improved service reminder to show multiple services due
·
Improved service due date calculations to use prior odometer
entry if service entry is missing an odometer value
Version
1.70 – April 24, 2006
·
Fixed “divide by zero” error that occurred if you set a
service to repeat every 0 days or 0 weeks.
Version
1.69 – February 10, 2006
·
Updated to display numbers with commas instead of periods
when european number formats selected
·
Updated number pads to input commas when period button
pressed when european number formats selected
·
Fixed scrolling of services on Scheduled Services screen
·
Fixed crash when hitting scroll button on chart display
screen
Version
1.65 – October 10, 2005
·
Added "numeric" tagging of text fields requiring
numbers (activates number-shift on Treos)
·
Added "fnav" resource to fix 5-way navigation
order on all screens
·
Added option to base service due dates on scheduled
date/miles instead of last completed entry
·
Added option to generate service summary from scheduled
services screen
·
Added option to show cost/mile on gas summary list
·
Added Treo scroll button support on text report screens
·
Added auto-conversion of exported report text from Palm/Unix
linebreak character (LF) to PC linebreaks
·
Added service name to "service due" alarm
·
Improved layout of services/expenses screen
·
Updated code to automatically check and set backup bits for
data files in case 3rd party app changes them
·
Fixed exported reports from containing text from previous reports
if new report is shorter
·
Fixed truncation of long notes on log detail lists for
entries prior to current year
·
Fixed crash on service summary screen that occurred on some
devices
·
Fixed summary reports from including miles and data from
other accounts when filtering by one account
Version 1.00 - May 10, 2002
·
Initial Release
Appendix G – Legal Notice
This
archive is freely redistributable, provided it is made available only in its
complete, unmodified form with no additional files and for noncommercial
purposes only. Any other use must have prior written authorization from
TealPoint Software.
·
Unauthorized
commercial use includes, but is not limited to:
·
A
product for sale.
·
Accompanying
a product for sale.
·
Accompanying
a magazine, book or other publication for sale.
·
Distribution
with Media, Copying or other incidental costs.
·
Available
for download with access or download fees.
This
program may be used on a trial basis for 30 days. The program will continue to
function afterwards. However, if after this time you wish to continue using it,
please register with us for the nominal fee listed in the program.
CUSTOMER LICENSE AGREEMENT
YOU ARE
ABOUT TO DOWNLOAD, INSTALL, OPEN OR USE PROPRIETARY SOFTWARE OWNED BY TEALPOINT
SOFTWARE, INC. CAREFULLY READ THE TERMS AND CONDITIONS OF THIS END USER LICENSE
BEFORE DOING SO, AND CLICK BELOW THAT YOU ACCEPT THESE TERMS.
1.
License. You are authorized to use the Software Product owned and developed by
TealPoint Software, Inc. on a single hand-held computing device on a trial
basis for thirty (30) days. If after 30 days you wish to continue using it, you
are required to register with TealPoint and pay the specified fee. This license
is not exclusive and may not be transferred. You may make one copy of the
Software for back-up and archival purposes only.
2.
Ownership. You acknowledge that the Software Product is the exclusive property
of TealPoint Software, Inc, which owns all copyright, trade secret, patent and
other proprietary rights in the Software Product.
3.
Restrictions. You may NOT: (a) decompile or reverse engineer the Software
Product; (b) copy (except as provided in 1 above) sell, distribute or
commercially exploit the Software product; or (c) transfer, assign or
sublicense this license.
4.
Disclaimer of Warranty and Liability. TEALPOINT MAKES NO WARRANTY, EXPRESS OR
IMPLIED, AS TO THE ACCURACY, COMPLETENESS OR FUNCTIONING OF THE LICENSED
SOFTWARE, INCLUDING WITHOUT LIMITATION, WARRANTIES OF MERCHANTABILITY OR OF
FITNESS FOR A PARTICULAR PURPOSE, ALL OF WHICH TEALPOINT DISCLAIMS. ALL
LIABILITY IS DISCLAIMED AND TEALPOINT ASSUMES NO RESPONSIBILITY OR LIABILITY
FOR LOSS OR DAMAGES OF ANY KIND, DIRECT OR INDIRECT, INCIDENTIAL, CONSEQUENTIAL
OR SPECIAL, ARISING OUT OF YOUR USE OF THE LICENSED SOFTWARE, EVEN IF ADVISED
OF THE POSSIBILITY THEREOF.
5.
Termination. You may terminate this Agreement at any time by destroying your
copy(ies) of the Software Product. The Agreement will also terminate if you do
not comply with any of its terms and conditions, at which time you are required
to destroy your copy(ies) of the Software Product and cease all use.
6.
Applicable Law. This Agreement is governed by the laws of the State of California.